


Have you ever erased some pictures from your camera or computer only to realize later that you need them back? Well, it can happen to anyone. But what you often fail to realize is that you can usually recover erased pictures using some outstanding data recovery tool. Both Windows and Mac operating systems give you an opportunity to recover your data from Recycle Bin and Trash respectively. The deleted data usually hangs around here for a while. So, we will guide you how to recover erased pictures on your system in the most effective way.
Part 1. How to Recover Erased Pictures Using the Most Reliable Method
The best of the best data recovery tools that we have ever come across is the iSkysoft Data Recovery for Mac (or iSkysoft Data Recovery for Windows). With four amazing data recovery modes, Recoverit (IS) for Mac is an awesome tool to recover erased pictures in few simple steps.
It offers the simplest, fastest and safest data recovery because of its easy to use program interface. The tool is compatible with almost all the devices and their various versions. Other than the accidentally deleted photos, you can also use this tool for recovering videos, music, documents and a lot more that is lost, formatted or deleted from your device.
Why Choose This Erased Pictures Recovery Software:
- The interface of the program is simple, attractive and intuitive.
- The tool has preview option for viewing files before actually recovering them so that you recover accurate files.

- The scanning process of the tool is the most powerful and finds out all the erased pictures.
- The program performs read-only process which enables it to recover data in its original form.
Step-by-Step Guide to Restore Erased Pictures on Mac
Step 1. Go to the official website and download the program. After the program is installed on your system, launch it to navigate to its main interface. Now select "Photo" to be recovered. If you want to recover other file types, you can choose them in altoghter in this step. After that, click "Next".

Step 2. A list of all the logical drives will be displayed on your screen. You can choose any internal hard drive or external storage device after connecting it to the computer and start the scanning process. In case, the drive you want to scan is unavailable, simply click on the refresh icon. After select the drive, you can click "Start" button to search for erased pictures.
There are two scanning modules as well: normal scan and deep scan. In default, the program will run the normal scan first and if you want to recover more files, you can run either but "Deep Scan", which is more powerful and efficient in thoroughly searching the drive.

Step 3. In few minutes only, you will see all the found folders on your program's interface. Preview the folders for its contents and select the files you want to recover. Now, click on the "Recover" button and then "OK" to save the restored files to a new location.

To avoid overwritten or permanently damaged files, make sure you save the retrieved files to some other external storage device.
Part 2. How to Recover Erased Pictures from Recycle Bin on Windows
It happens quite often when we delete some picture on our windows computer and realize suddenly we made a big mistake. You may even feel annoyed of yourself to have done something so miserable and irreparable like this. But don’t panic because Windows operating system provides you with an in-built Recycle Bin in the system. All your photos or other files that you delete from the system automatically go to the bin and hang around there for some time. So, follow these simple steps and recover erased pictures from the Recycle Bin of your computer.
Step-by-Step Guide to Recover Erased Pictures from Recycle Bin on Windows
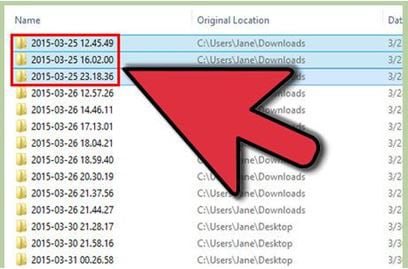
Step 1. Usually, the folder of Recycle Bin is always situated on the desktop. In case, it is not visible on the main screen, go to My Computer. Click on Recycle Bin and open the folder.

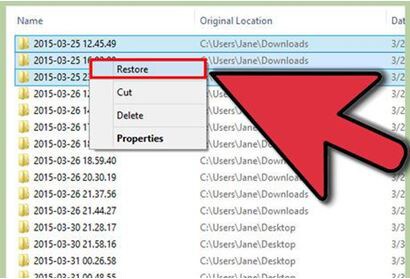
Step 2. Inside the folder, you will see a list of all the files that were accidentally or deliberately deleted. Select the files that you want to recover again. Here, we are looking for the erased pictures.
Part 3. How to Recover Erased Pictures from Trash on Mac
You empty your Trash Bin on Mac and realize that there were few important files that you need back. Well, you are not alone. There are a lot of Mac users who encounter this serious problem quite often. But it is very easy to restore the actual location of a file that you have accidentally sent to the Trash. It will take few steps before your file will be restored to its actual location.
Step-by-Step Guide to Recover Erased Pictures from Trash on Mac
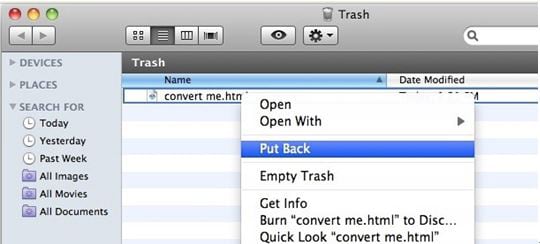
Open your Trash Bin folder on the Mac operating system. Here, you will have to do either of the two things: keystroke or right-click option.
Keystroke: With this option, you will have to select an item that you want to restore from Trash and press Command ₊ Delete keys. This will send the item back to its original location.
Contextual Menu: Choose the item and right click on the file or picture you want to restore. Now from the drop down menu that appears on your screen, select Put Back option.
Whether you go for keystroke or for the right-click menu, the recovery procedure is simple and same with both the tricks. Restore to Previous Location feature offered by Mac is super easy and amazing. It will also save a lot of time that you would have wasted navigating around numerous files and folders stored in the file system.
There is no limitation on the number of files as well. You can choose one, two or many files at a time from the Trash to restore all of them to the original location where they were saved prior to deletion.


