


It can be very frustrating to lose data from a device, whether intentionally or unintentionally. Deleting files accidentally results in a feeling of doom and despair once you realize what you have done. However, fret no more because there are proven ways to recover lost photos on sd card. Whether you need to recover photographs from your DSLR camera, or misplaced files on your Mac or Windows computer, we have some methods listed here that are guaranteed to work. Imagine your device as a black hole; once something is inserted there, it is next to impossible for it to escape and you can almost always retrieve it from there. Even with the introduction of supposedly fail-safe disk-erasers, files tend to leave a significant imprint on the device's storage.
Part 1. The Safest Way to Recover Lost Photos on SD Card
For fortunate Mac users, there happens to be a software that can assist you in recovering your most cherished memories, and it is only a few clicks away. You will need a little bit of time and patience, plus a computer and an Internet connection. The software is iSkysoft Data Recovery for Mac (or iSkysoft Data Recovery for Windows). It doesn't matter whether it was a virus or pressing Shift and Delete, Recoverit (IS) is a cost-effective and safe solution to the issue at hand.
Why Choose This Software to Recover Lost Photos on SD Card:

- You can retrieve data from your PC's hard drive, an external drive, a USB drive, or a memory card.
- It has a user-friendly interface that even the most amateur person can handle without added assistance.
- It also offers a deep scan option and users can preview the scanned software to select which files they wish to recover.
Step-by-Step Guide to Recover Lost Photos on SD Card:
Step 1 Downloading and Installing Software
You can download the software online. Once you've downloaded it, run the file and install it by following the instructions. Open Recoverit (IS). You will be greeted with the following interface. Select "Photo" tab from the main window, and click "Next" button.

Step 2 Scan the Drive
Select the drive where you've misplaced your files, then click "Start". Click on "Refresh" icon if your drive is not visible in the "External Removable Device" list. It should appear.

Step 3 Recover Lost Photos on SD Card
After scanning is complete, the following window will come up where you can preview files before choosing which ones to restore. To recover a file, simply select it, then click the "Recover" button at the top of the window, and save the file to the selected path.

And there you have it, the file has been restored in just four easy steps! That's how to recover lost photos from a memory card!
Part 2. Other 9 Methods to Recover Lost Photos on SD Card
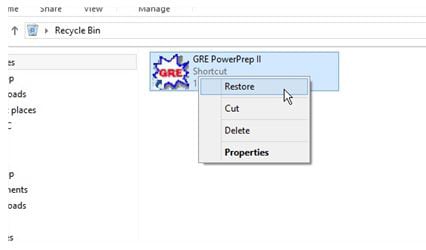
1. Recycle Bin
If you're a Windows user, deleting a file accidentally doesn't erase it as yet from the system – it recycles it. Therefore, here's what you do to restore it.
Step 1: Open Recycle Bin, which is on your Desktop.
Step 2: Go to the file, right click, then select "Restore".
And Windows does ask for confirmation before a file is sent to the Recycle Bin, so consider that a double protection.
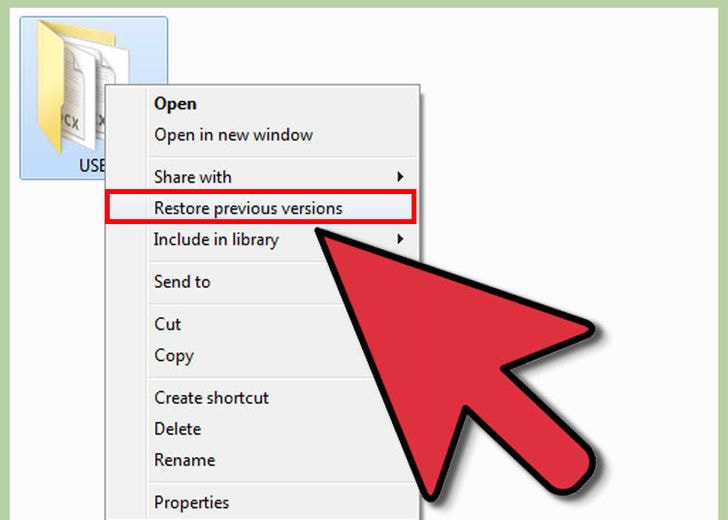
2. Restore Previous Versions of Deleted Pictures on Computer
Step 1: Open the Start menu (if you are using Windows 7 or an older version), select "Computer".
Step 2: Locate the folder with the picture files you wish to recover. Right-click it, and select "Restore previous versions".
Step 3: Review the list of previous versions within the drive.
Step 4: Just to be on the safe side, relocate the recovered folder/file to a new location on your computer.
3. Recovering lost photos from camera or memory card
For this, you can download the aforementioned iSkysoft software. The software also has other modes, including Raw Data Recovery, for a deeper scan and recovery of file signatures; Partition Recovery to resurrect a whole partitioned disk; and the Resume Recovery option can be used to restart scanning some other time if it is taking too long. For recovering lost photos, we recommend using the Lost Data Recovery mode as you can scan according to files as well, so you can specify photos.
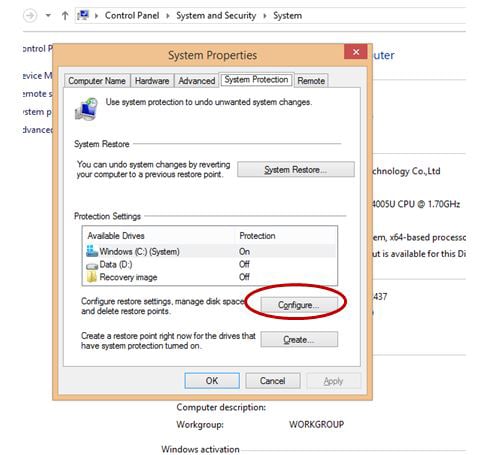
4. Deleted Photos on Windows Computer
Step 1: Go to Control Panel, System and Security, then click on System Protection.
Step 2: The following dialog box will come up, displaying your drives with corresponding protection statuses.
Step 3: Select a particular drive, click on "Configure".
Step 4: Click "Restore system settings and previous versions of files". Click OK.
Now you should be able to see an option to recover a particular file.
5. Make a Dropbox or Google Drive Account
With the rise of cloud storage, what better way is there to make sure your files remain just a few clicks away? Dropbox offers 2 gigabytes of free space, whilst Google Drive offers a whopping 15 gigabytes. You shouldn’t complain after using some of that storage to back your photographs up.
6. Make Regular Back-ups.
Instead of relying on just the one memory card or SD card, why not use multiple devices? That way, you will be spreading the risk (also known as risk diversification), and you won’t have to be entirely dependent on a single stick of memory.
7. Android Phones
There is a reason Android phones are known as smartphones. You can opt to store all photos on the SD card, or in the internal memory storage of the device. Some phones even come with an inbuilt feature of restoring photographs if they are lost or accidentally deleted. For instance, you can go to the application you used to take the photo and click on "Trash" there (or "Bin", etc.), and choose the file you want to restore. It is that easy!
8. Android and PC Software
For those who opt for the easy way out, there is a whole range of android and computer software out there that is easily available and downloadable. Software that is free of cost may come with strings attached: only trial versions may be available. But purchasing it from any local hardware/software or computer store will grant you access to the full experience. We highly recommend the Recoverit (IS) software to restore lost photos. It has multiple modes, and you can preview your files; furthermore, you can also pause and resume scanning drives or disks at ease.
9. Other Safety Precautions
It is better to be safe than sorry, and this could never be truer than when you accidentally delete that cherished memory! Take care of your devices. Here are some tips to get you started:
- Delete pictures on your computer, not on your camera. Yes, go through the extra trouble of plugging your DSLR to your computer. You'll save a lot of potential trouble.
- Make use of the "Safely Remove Hardware and Eject Media" option if you are a Windows user. Disconnecting the device randomly can cause damage to it.
- Copy your photos to your computer, then format your memory card. Also, make sure you keep some free space in your SD card at all times.
- As soon as you come across some error or problem, stop snapping pictures. Turn your camera off, connect it to the computer, and begin transferring all the photos. Odds are that you'll still be able to retrieve the files, but if you continue taking pictures, the odds will not be in your favour.
- Don't keep switching your camera on and off. This places strain on the battery, which in turn could damage your SD card and photos.
- Keep your cards and device updated.
- Be careful in the simplest things; they usually cause the most harm. Don't expose the card to extreme temperatures. Keep them dry, and if possible, try to keep them in separate cases. Don't put physical pressure on them as this may cause them to break. Pretty clichéd advise, but very useful!


