There is a high possibility that we lose photographs due to accidental deletion, attack of a virus, or system correction due to an upgrade. We will be lucky if we have taken a backup of the images from our devices to the computer. If not, then we will be in deep pain because of losing all the beautiful memories. There has been tremendous research on this issue, and now several programs are offering different ways to restore deleted photos. The post here talks about the important methods through which you can retrieve deleted images.
Part 1. The Best Way to Restore Deleted Photos on Mac
The procedures explained above are helpful in restoring deleted photos from your Mac/Windows PC. However, there are only helpful if you have the images in the recycle bin, have enabled Time Machine and created a backup. Additionally, there is no guarantee that the process will hamper the existing data. In such cases, the best way through which you can restore deleted photos from Mac is by using iSkysoft Data Recovery for Mac.
The recovery tool is the fastest, safest, and easiest solution to get back accidentally deleted, data lost due to formatting drive/partition or improper operation. With the cooperation of the program, you can quickly recover everything from your Mac as it supports all the latest file formats. In addition, it is fully compatible with OS X 10.12, 10.11, 10.10, 10.9, 10.8, 10.7, 10.6, and 10.5.
Why Choose This Software to Restore Deleted Photos:
- Quick recovery settings
- One-click pause and start scan option

- Scan for only specific file formats
- Distinguish between valid and invalid files before recovery
- Recover files with their original names and paths
Step-by-Step Guide to Restore Deleted Photos on Mac
Step 1. Download iSkysoft data recovery for Mac from the official website. You can install it on your Mac like any other program. Start it by clicking the icon on the desktop. Once the main window opens, you will notice the presence of the 6 file type options. Choose "Photo" tab and click "Next" button.

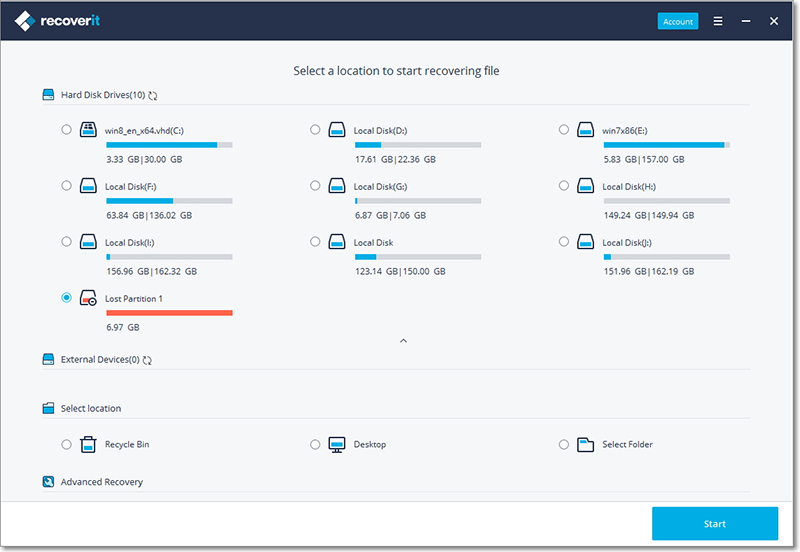
Step 2. This program is capable of retrieving deleted content from trash, formatted partitions, and erased content. Once the next window opens, you will notice that it will display the list of partitions and hard drive along with the size and details of the file system. You can select a particular volume/partition and click the "Start" button from the menu bar to initiate a scan.

Step 3. After Recoverit (IS) for Mac completes the scan, it will display the recoverable data in a new window. It will arrange the files according to the file format and path. From the left pane of the screen, you can select the images folder to view the recovered pictures. In the same screen, you can obtain a glimpse of the image by choosing a particular file. Use the check boxes to mark the files that you wish to restore, and press the "Recover" button from the menu bar. The program will ask you to define the saving location. It is preferable to choose an external device. iSkysoft will begin the recovery process and will save the images in the selected folder. Wait for the program to complete the process.

Tips:
- Use deep scan technology to recover additional files. The process is time-consuming.
- The validity attribute tells you about the files good and bad sectors.
Part 2. The Best Way to Restore Deleted Photos on Windows
Like Mac, there is iSkysoft Data Recovery for Windows version, making it easy for users to retrieve deleted photos with ease. The software provides for innovative recovery modes, giving complete control to the user in getting back the deleted content..
Why Choose This Software to Restore Deleted Photos:
- Four recovery methods - wizard mode, lost file mode, raw file mode, partition recovery
- Retrieve everything from Windows PC
- Flexible settings and preview ability
- Recovers data according to original file structure and names
- Classifies a file according to its validity attribute
Step-by-Step Guide to Restore Deleted Photos on Windows
Step 1. Install the Windows version of the program from the official website. Launch it by clicking the icon on their desktop. You will see four recovery modes appearing in the product window. Click "Lost File Recovery" option.
Step 2. In the next screen, you will see the partitions of your local disk. You have to pick up the partition from which you wish to retrieve the deleted images. Press the "Start" at the bottom to begin the scan.

Step 3. The program will begin scanning the selected disk/partition for recovery of the images. Once done, it will show you the result in a new window where it will arrange the files according to the file types and original path. From the left side of the product window, you can select the images files format to view the recovered images from the selected partition. You can click on a specific file to view its content in the preview screen. Use this option to mark the pictures that you wish to retrieve from your local hard disk. After completing the selection process, click "Recover" at the bottom to allow Recoverit (IS) for Windows to recover the images.

The program will ask you to define the saving folder. Use the filter button to navigate to the location where you want to save the files. It is preferable to choose an external hard disk/drive to save the images. Wait for the program to complete the process, after which you can browse the folder to view the recovered pictures.
Tips:
- The program will display the files in their original names. You can search for a particular folder/file using the file name if you remember the path or name.
- You can activate deep scan option to retrieve additional files from a formatted drive from your disk.
- Use the Save Scan button to save the scan results. You can use the results in the future to recover the preferable files according to the need.
- The file attribute provides information about the status of whether it is good or bad for recovery, making it easy for a user to select them for recovery.
Part 3. How to Restore Deleted Photos from Recycle Bin
The Recycle Bin in a Windows OS is similar to that of Trash on Mac. It is the place where all the deleted files are present and are possible to restore the files back to their original path. However, if you are deleting the files in the recycle bin, then it is impossible to restore using the traditional procedure. Usually, the recycle bin space is adjustable, and the default size is 10% of 40 GB of your primary disk and 5% after that. It is possible to change the space according to the operating system, the space availability, and the requirement. Increasing the recycle bin space too much will slow down the performance of the computer. Therefore, it is preferable to go ahead with the default settings.
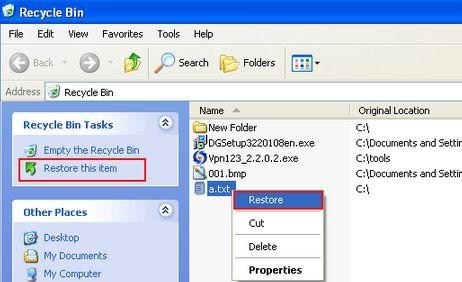
If you deleted files/images from any of the partition or desktop, they go directly into the recycle bin. You can easily retrieve them by opening the recycle bin folder and clicking the restore button. The process will ensure that the deleted file will be back to its original folder along with its original properties. It is the easiest and the common method in recovering deleted photos from recycle bin.
Part 4. How to Restore Deleted Photos from Time Machine
Time Machine is a built-in backup software by Apple, which helps in easy recovery of a partition/individual files. It supports Time Capsule and backup disks that are communicating each other over the network if these disks support Apple File Protocol file sharing. When enabled, the backup software creates a periodic snapshot of files and catalogs on an external hard drive. You can set the period as the hourly, daily, and weekly. When the drive is full, the Time Machine deletes the oldest backup and replaces with the new versions.
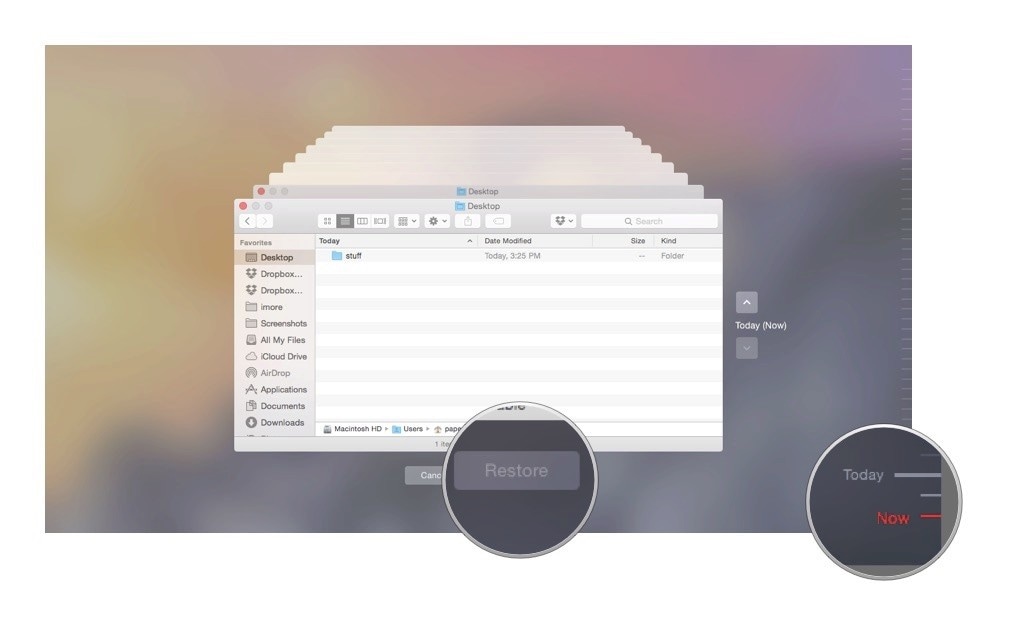
If you wish to restore the deleted images from your Mac using Time Machine, you have to begin the process by selecting System Preferences and then choosing Time Machine icon. When the new window opens, you have to enable “Show Time Machine in menu bar” option.
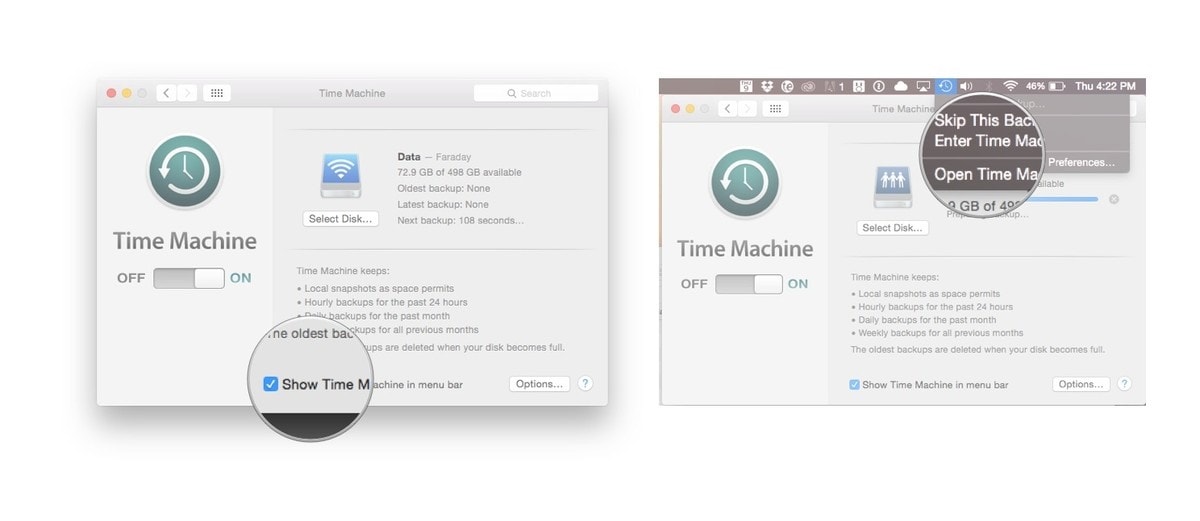
It will allow you to display the Time Machine option directly in the menu bar. Enter the Time Machine application from the menu bar. Selecting the option will take you to the Time Machine window. From this window, it is possible for you to navigate to the folder or the file that you wish to replace. If you remember the name of the images folder, you can find it in the question and then click Restore button to send the images from the folder back to its original location along with its original properties.