


How to undelete photos is no longer a tedious procedure. The improvement in the software has led to the utilization of recovery tools, which are capable of recovering data with ease and in a few simple steps. The growing use of gadgets, especially the smartphones, has led to a revolution of capturing pictures. We are now consuming a lot of space in devices purely for storing photos rather than any other media. However, there is a possibility for the loss of data due to a virus attack/corruption of a file system/formatting a partition. Let us look at the three important ways through which you can undelete photos.
Part 1. Is It Possible to Undelete Photos
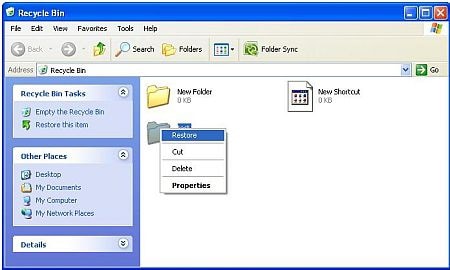
Recovering deleted photos is possible unless you made any changes to the file system. Simply put, if there are no further operations involved using the device, there is a high probability that you can easily get back the deleted pictures. For instance, let us think that you have mistakenly deleted a photo from your Windows PC. When you use the delete button, the files removes itself from the folder the makes its way to the Recycle Bin. You can browse the folder, check for the files, right-click, and choose restore to get it back to the original location.
If you permanently deleted a picture, using Shift+Delete button, then unless you make heavy changes to the folder, you still possess the chance to retrieve the picture. It is because the operating system removes the file from the file allocation table or the master file record but not completely from memory. However, if you made any changes to the folder, such as copying the content or adding new pictures, you are writing bytes to the designated sector, which is rewriting the contents. Such a step makes it impossible to get back the data.
If you permanently deleted a picture or a folder containing the images and carried out subtle changes to it, then you require the use of third-party recovery tools that assist you in getting back the accidentally deleted content from your hard drive.
Part 2. How to Undelete Photos Using the Safest Software
As we are speaking about the use of the third-party recovery tool, the first element that comes into the mind is whether they are safe in retrieving the content. Of course, a few programs do not function as stated and that is why we are here to help you pick up the best in the field, iSkysoft Data Recovery for Mac (or iSkysoft Data Recovery for Windows). The Data Recovery tool is long-standing software with exceptional features that will help you get back all the data that you need without hampering the present content or manipulating the OS.
The Data Recovery for Mac hosts plethora of algorithms that are robust in scanning both good and bad sectors, making it easy for retrieval of the content. Additionally, it provides the opportunity to scan for selected file formats, which allows you to choose only the desired files rather than scan the entire hard drive for the existing content.
Why Choose This Undelete Photos Software:
- A single click operation to start and stop scanning process.

- Save the scanning information to future recovery.
- File attribute assists you in telling whether the file is good or bad for recovery.
- Search for deleted file/folder using the name and path
Step-by-Step Guide to Undelete Photos on Mac
Step 1. You can get Recoverit (IS) for Mac from the original site and download the same. After completing the installation, which is similar to other programs on your Mac, launch it by clicking the icon on the Mac desktop. The product window opens displaying the four innovative recovery modes. You have to click the file types that you want to recover to proceed ahead.

Step 2. The "Lost File Recovery" is capable of scanning for information lost due to accidental deletion, removal due to the corruption of file system or pressing the Shift+Delete button. Clicking the option will open a new window, where the software will display the different partitions of the hard disk. If there is nothing, do not worry; just press the refresh button to get the list. Once it appears, you have to pick the partition from which you wish to undelete the photos. Highlight the same and press "Start" from the menu bar to begin scanning the volume.

Step 3. This undelete photos software will launch the scan and complete it based on the content present in the partition. It will display the results after finishing the scan in an arranged manner according to the file format and path. You can view the content of a file by selecting any one of it from the list and seeing it in the preview screen. You can use this option to mark the pictures that you want to retrieve. Tick the check boxes of the files and press "Recover" to get them back from the hard drive. iSkysoft will ask you to pick the saving destination. Do not mention the same partition as the location, but choose an external drive as a safety parameter.

Note:
- Activate the "Deep Scan" technology in case you are scanning a formatted partition. The technology will help in retrieval of additional files.
- The file attribute will consider the good and bad sectors of the file and calculates the overall chances of retrieval. It will display the results after scanning and before recovery. Make use of it to pick valid files that are easy to extract.
- The preview screen gives you a glimpse of documents, music files, video files, and other content. Use it to see whether you are choosing the appropriate file.
- The program saves the recovered content using their original file name, structure, properties, and path.
Part 3. Tips on How to Backup Photos
1. Backing up the photos to an external drive is the simplest and common method to safeguard images in a computer. You can plug in an external drive or flash drive, use the Windows File Explorer, and move the photos manually. You can set a reminder for the same or allow backup software to perform the action.
2. Use the cloud services such as Dropbox, Google Drive, OneDrive, pCloud, and many others to upload the pictures. Although a free signup has limitations on the space that you can use, opt for a membership if you are in need of tons of space. A major advantage is the ability to download the uploaded pictures from anywhere, anytime, and using any device. You can further link the folder to the application on your computer to setup an automatic syncing feature, which will upload the sync data according to the changes that you carry out for the selected folder.
3. The first two methods are helpful for creating a backup of the photos. If you wish to create a backup of the entire system, then you do need a software that will help you with the creation of disk image or ghost image. You can use the same images in future if you find fault with your hard disk.


