


All of us love taking pictures and with the advent of smart phones and digital cameras, it has become even more popular to capture each and every special moments of our lives. These pictures are something that we will cherish for our lifetime and so it is necessary to take proper care of them. However, data loss is inevitable and can occur at any time. So, it is always sensible to remain prepared with your backup plan in case it happens to you. Because we all know it is not possible to eliminate the possibility of data loss completely, we keep certain tools in our system. You may also have some tool like Photo Recovery Genius in your toolkit. But we have reviewed an alternative to Photo Recovery Genius for you here which is far better than this one. We highly recommend Recoverit (IS). It is a remarkable tool for recovering any data.
Part 1. Photo Recovery Genius Alternative Software for Mac and Windows
iSkysoft Data Recovery for Mac (or iSkysoft Data Recovery for Windows) is a simple yet powerful data recovery tool that enables you to recover data from any drive or external drive. The application features four remarkable recovery modes: Partition Recovery, Resume Recovery, Lost Data Recovery and Raw Data Recovery. No matter what has caused data loss on your system, you can count on this amazing tool for recovering it in its original form. It can recover a wide variety of data including videos, music, photos, documents and more. It also supports all the internal or external hard drives and external storage devices.
Why Choose This Photo Recovery Genius Alternative Software:

- The user interface of this tool is attractive, intuitive and easy to use.
- It also features Preview option so that you can see the folders and its content to find out all the recoverable files.
- The program offers two scanning modules where Deep Scan option is more powerful and competent in thoroughly scanning the particular drive.
- It performs read-only process and so the recovered data is never changed or corrupted.
Step-by-Step Guide to Use Photo Recovery Genius Alternative Software
The tool is very simple to use and will only take few minutes to recover all your lost, deleted or formatted photos from any of the external storage device such as memory cards, SD cards and USB sticks.
Step 1 Launch the Alternative to Photo Recovery Genius
Once you have successfully downloaded and installed this program on your system, launch it to start your data recovery process. On the main user interface of the program, you will see the supportted data types. If you want to recover your lost photos, you are supposed to select "Photo". Then click on "Next".

Step 2 Scan the Hard Drive
Now, a list of all the drives and storage devices connected to your computer will come up on your screen. You can select any disk that you want to scan and click on the "Start" button. The software will start scanning the data on your drive.

Step 3 Recover Lost Photos
After the scanning process, all the found folders will queue up on the left side of the screen. You can select any folder you want and Preview its content. Click on the "Recover" button after selecting the files you want to recover. Now, a dialog box will pop-up on your screen, press on "OK" to save the recoverable files to another folder. You can also choose the option "Deep Scan" to perform a more powerful scanning of the selected drive.

Choose some external storage device to save your recovered data and do not save it on the same drive from where it was lost earlier.
Part 2. How to Recover Data Using Photo Recovery Genius
Photo Recovery Genius is a nice tool that gives you the possibility to bring back files not only from the Recycle Bin but also if they are completely lost or deleted from some other drive. It displays all the recovered files in a tree view of directories and is capable of retrieving MP3 files, video formats and other documents too. You can also Preview the content of a selected file using this tool as well.
Step-by-Step Guide to Recover Lost Photos Using Photo Recovery Genius
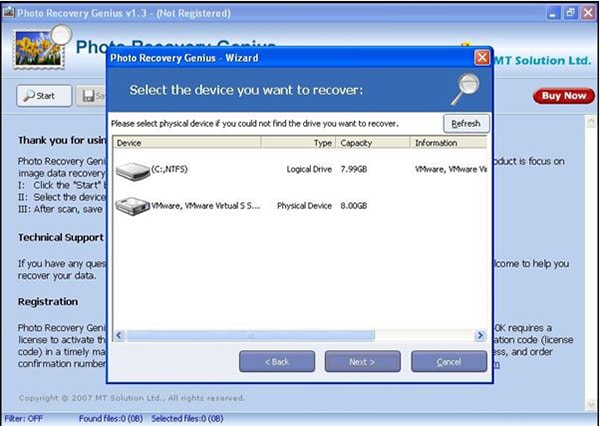
Step 1. First of all, download the program and install it on your system. Now launch it and go to its main menu. The next step of the process is to choose your drive or storage drive from which your photos are lost. It will show all the connected logical drives and physical devices. You can also click on the Refresh button if your devices are not displayed on the screen. After choosing your disk, click on the Next button.
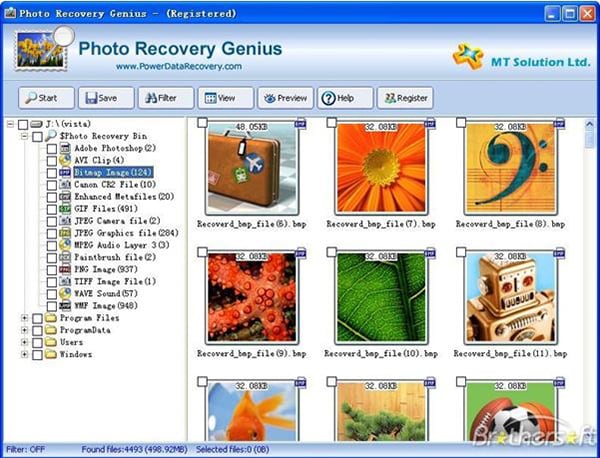
Step 2. After the searching of the selected disk will finish, a list of all the pictures ever lost on your drive will come up on your screen. The tool sorts out images on the basis of their formats. So, you can click on the format folder and Preview the photos you want to recover. Select the images and then click on the Save button to restore the files back to your system.
Part 3. Troubleshooting on Using Photo Recovery Genius
With Photo Recovery Genius, you may not be able to find all your drives on the list several times. In this case, you can try clicking on the Refresh button made available on the user interface. If the particular drive or external storage device is not displayed on the screen even after refreshing, try to uninstall and install the program. You can also unplug the device and insert it again to make sure the connection between the computer and device is not interrupted.
Part 4. Comparison of Recoverit (IS) and Photo Recovery Genius
|
Software |
Scanning Mechanism |
File Formats |
Compatible OS |
Program Interface |
Preview Option |
Rescue Files From Drives with Bad Sectors |
|---|---|---|---|---|---|---|
| Very Strong | Audio/Video/Photo/Emails/Contacts/Documents and more | Windows/Mac | Interactive and Easy to Use | Yes | Yes | |
|
Photo Recovery Genius |
Strong | Photo/Videos/Text Documents | Windows | Dull and feature-less | Yes | No |


