


Can I Remove Background in PowerPoint?
PowerPoint has multiple tools to aid in removing backgrounds from photos but it all depends on the version you are using. Different versions have different editing tools. All versions have tools for making backgrounds transparent while selected versions have tools for erasing background.
- Part 1. How Can I Remove Background with PowerPoint?
- Part 2. Most Effective Way to Remove Image Background
Part 1. How Can I Remove Background with PowerPoint
PowerPoint will always have its positives and negatives that are important to understand prior to making a choice. You can print your images with ease. It allows for proper organization of images and it's friendly to users. However, you can lose important details about your images in some cases but not always. Are you aware of the steps involved in removing background from images with PowerPoint? Well, they are there and are very straightforward. That makes PowerPoint a program ideal for use by both professionals and beginners so you should not have any reservations.
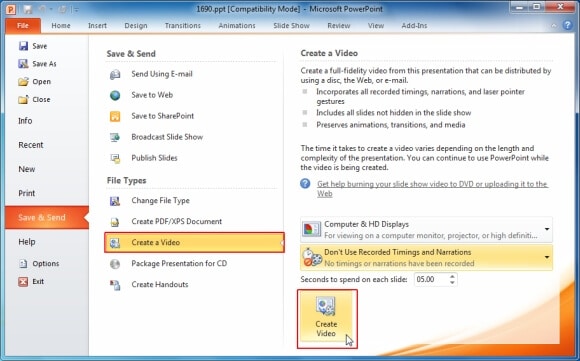
- Step 1 - In the program, double-click the picture that you are going to edit and then click on the "Remove Background" button that is visible on the "Picture Tools Format" tab.
- Step 2 - Using the "Mark Areas" icon to mark out those sections of the background that you want erased. The buttons should have it easy to determine exact locations of the background to be removed. Precision is very important to ensure no messes occur.
- Step 3 - The second step should be repeated for as many times as possible until you are sure the entire background has been removed. If there is any action you take but was wrong, you can always undo on PowerPoint by pressing the "Ctrl+Z" buttons on the keyboard.
- Step 4 - There is a button marked "Keep Changes" which you will click to save every change made to the photo.
Part 2. Most Effective Way to Remove Image Background
You will not face a lot of demands when using PhotoScissors. It's easy to work with even when you have no skill, thus both professionals and beginners can try it out. It's a very effective software program for removing backgrounds in still images and should be your ultimate choice anytime you are looking for such a solution.
Most Useful Features of Teorex PhotoScissors:- High Processing Speed - it will take you seconds or minutes to accomplish your mission.
- Offset Boundary - this is a feature that will make sure you have neat and precise contours of the edited image.
- Intuitive Interface - you will always have an easy time editing your photos.
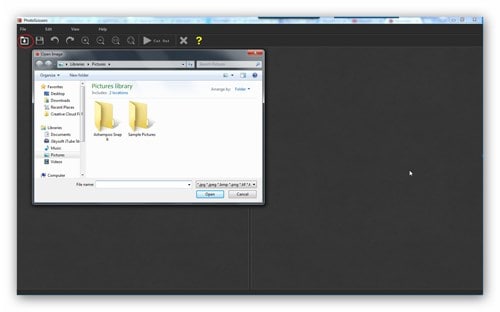
Step 1. Import Image
This will take place once you have installed PhotoScissors to your computer. Then, you can launch it, add the image you need to edit and open.
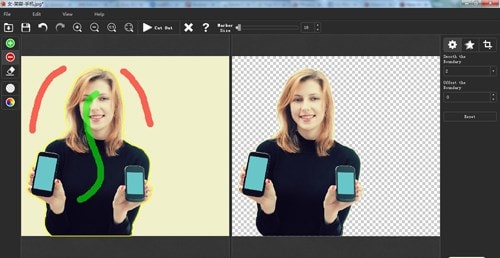
Step 2. Mark out Image
Separate the background and foreground of your image by marking out. The background will be removed while the foreground remains thus making out this difference is critical enough.
Step 3. Apply Changes
To finish off, apply the changes you have made to the photo then save in an accessible folder in the computer. The format used has to be compatible.
Tips: How to remove background in Word?
Microsoft Word has tools for removing background from photos and the steps are as follows:
- Step 1 - Add the picture to Word and then click on it to open.
- Step 2 - Click on the "Background Removal" icon that is accessed through clicking "Picture Tools", "Format" and then "Adjust".
- Step 3 - Use the handles found on marquee lines to mark out the sections for removal and those to be retained. You must be very precise for a perfect outcome.
- Step 4 - From the "Close" tab, you will see an icon marked "Keep Changes" which you will click to have all changes applied and saved. Your image will be ready.


