A wedding ceremony is one of the most memorable events for most couples. To recall these happy moments, you can make wedding photo slideshows with your favorite wedding photos and videos to retain the most those precious memories.
How do you go about it? In fact, making a creative and amazing wedding slideshow on Mac yourself is easier than you thought. There are several easy to use wedding slideshow programs that can help you finish this project in minutes. Read on to find out which best program we recommend.
The Best Tool to Make a Wedding Slideshow
Having said that there are many wedding slideshow creators to choose from, the best tool we recommend users to use is Filmora Video Editor. This program allows you to use various slideshow templates to turn your wedding photos and videos into eye-catching slideshow movies in minutes on Mac.
Key features of Filmora Video Editor:
- Make your slideshows creative and amazing with pre-built templates.
- Share Videos Instantly and watch in High Definition.
- The operation can be conducted through the drag-and-drop feature, making the program fast and intuitive.
- Comes with an easy to use media editor for rotating, cropping and adding special image effects.
- Upload presentations to social media sites, video-sharing sites, and also transfers them to portable devices.
Tutorial on Making Wedding Slideshows
In this section, we have given a step by step guide on how to create stunning slideshows for a wedding using this program. .
Step 1. Launch the Program
Download and install this tool and then run the program to access its interface.

Step 2. Import pictures or videos.
To start a new project, click "Import" This program comes with a built-in Media Browser which allows you to import your images, audios, videos and other media files directly. The Media Browser icon can be turned off and on. Proceed by simply dragging and dropping your pictures and videos from the Media Browser to the timeline.
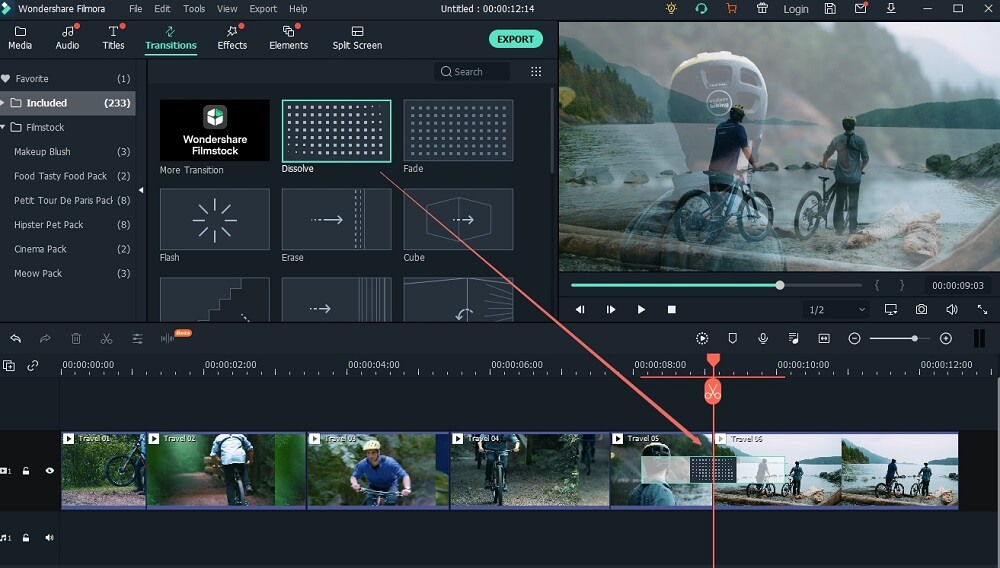
Step 3. Add transitions
You can add transitions to your slideshow video to make it look awesome.To do this, drag a desired transition to the timeline and drop it between two photos or video clips.
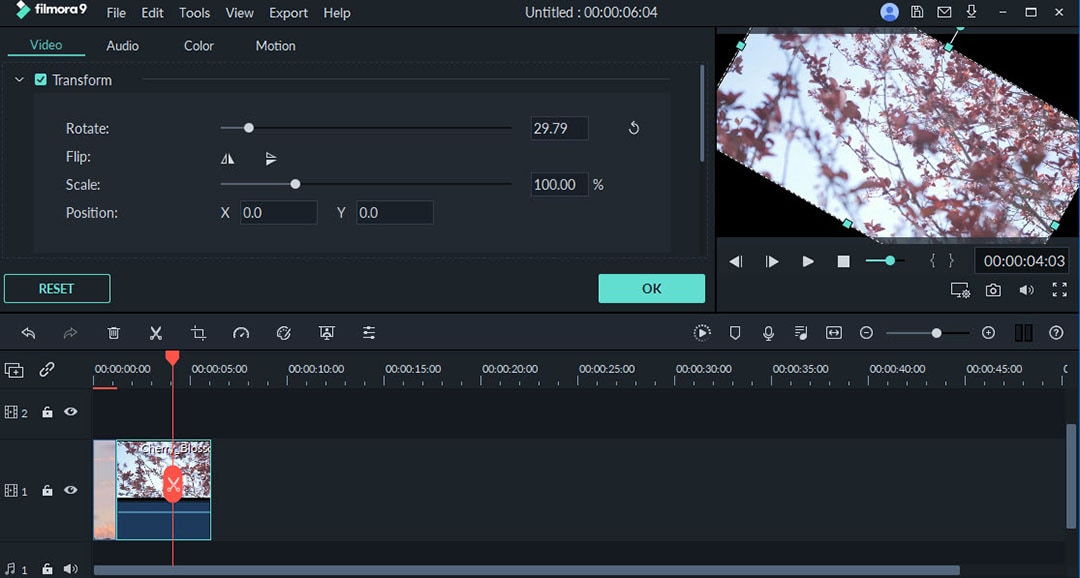
Step 4. Edit videos or pictures
Double click the photo or video you have imported to access the editing dialog.
Photo editing: In the photo editing windows, you will see three editing options which are Crop, Caption, and Filter. Select the desired caption template to add a caption. Just add the template on the screen and then enter your caption. To crop the photos, choose your desired aspect ratio, adjust it on preview windows and then click Apply changes.
Video editing: Drag the slider to adjust volume. Go to the bottom of the preview window to trim the video into pieces.
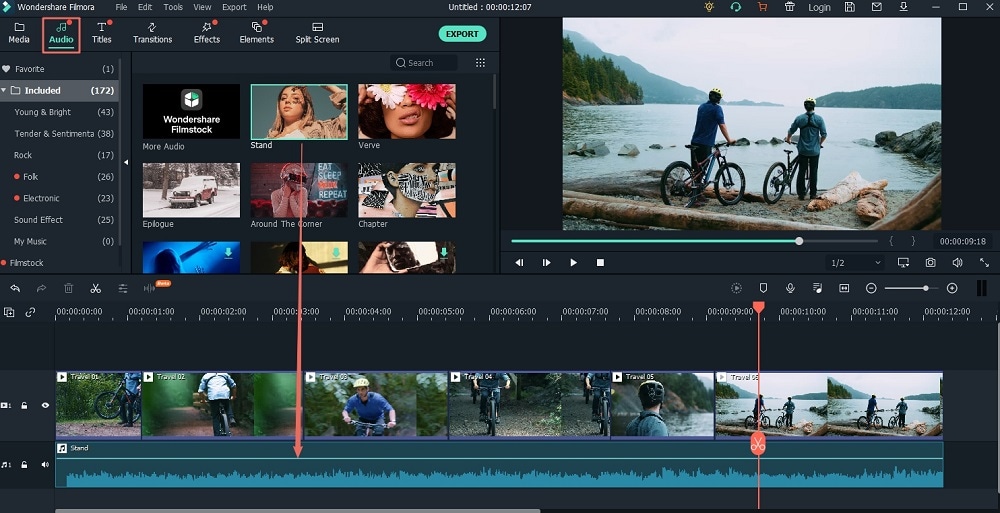
Step 5. Add music
Choose your favorite music from your computer, or switch to the Music tab to pick up your slideshow background music.
Step 6. Create slideshow
When you have finished changing the styles, editing your videos and photos, and adding the background music, you can export the slideshow, click "Export" to publish the video or click on iDVD or Burn to DVD icon to burn the slideshow to DVD.

Top 4 Unique Wedding Slideshow Ideas
Tip #1. Photos Selection
Have a selection of different photos that range from childhood photos to those awkward teen shots that can generate a lot of laughter. Of course, the slideshow will also need to have several photos of the couple as well as different photos of both families. Here, you are not restricted to particular photos as you can also throw in special wedding photos of close family and friends too.

Tip #2. The Love Story
If you will videotape this beforehand, you can share your romantic story on how you started off and how the two of you feel about each other and your goals together in life. This interview can be edited and placed somewhere in the slideshow along with some recent pictures. An engagement photo or your wedding invitation would suffice at this point.

Tip #3. Charming Background Music
Your music selection should be entertaining as it should also be a part of your theme. An elegant ceremony can call for sentimental romantic music while a lively one will need dynamic music as well. The idea behind this is to give the guests good entertainment as they wait to do what comes next.

Tip #4. Projection
Deciding on where the slideshow will be projected on can really make a difference on your ceremony. There are various unique places that you could project your slideshow on including the pool or a tent's ceiling depending on where the ceremony is taking place.