What is Photo Stream?
Photo Stream is a cloud-based photo sharing service provided by Apple. Once you turn on Photo Stream on your iPhone, iPad, iPod, Mac or Windows PC, your latest photos token with one of these devices will be available on all these devices.
How to Use Photo Stream
Requirements:
- ● Set up iCloud on your devices and need an iCloud Account.
- ● iOS device should be iOS 5.1 or above.
- ● Mac is running 10.7.5 or above.
- ● The second generation Apple TV with Apple TV software update 5.0 or above.
- ● Windows PC is running Windows 7 or above with iCloud Control Panel 2.1 or above.
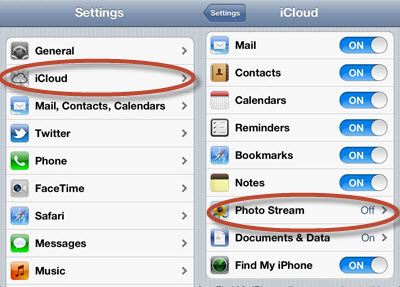
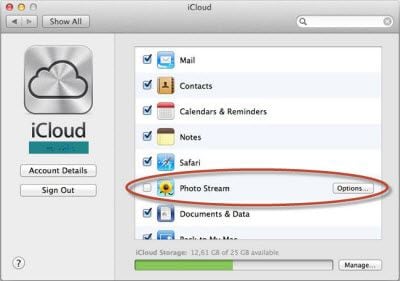
Turn on My Photo Stream:
1. Set up iCloud account on all the devices that you want to share photos with.
2. For iPhone/iPod/iPad, tap Settings and open iCloud > Photos, then turn on My Photo Stream.
3. For Mac, go to System Preferences to find iCloud > Photos (or Photo Stream). Click the Options button to check whether the My Photo Stream has been checked. If you want to use Photo Stream with iPhoto or Aperture, open these applications and turn on My Photo Stream.
4. For Windows, first install iCloud Control Panel. And open iCloud Control Panel and click Options to check My Photo Stream. Then click Apply.
What is iPhone Photo Library?
iPhone Photo Library is a list storing all your synced photos. After you sync photos from your computer to your iPhone, you will get Photo Stream on your Photos app. Photo Stream includes all the photos in albums or events you have synced, but they are only on your iPhone once.
How to Transfer iPhone Photo Library to Mac
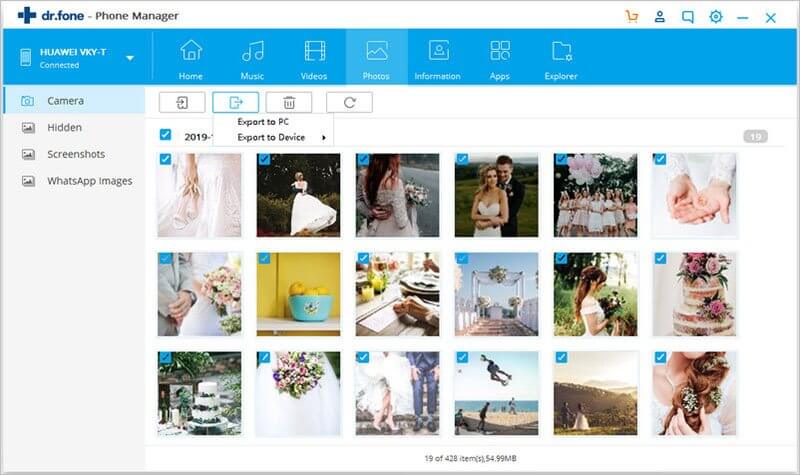
To transfer iPhone photos that are synced from computer to Mac, you need to apply a third-party iPhone transfer tool like dr.fone . This application can transfer any of your iPhone photos no matter from Photo Library or from Photo stream to Mac easily and quickly. Only three simple steps are needed:
Step 1: Launch dr.fone and connect your iPhone to Mac. Your iPhone contents will be shown on the dr.fone home page.
Step 2: Click "Photos" on the top pane to show all the photos in this tab.
Step 3: Now select the photos you want and click Export to start transferring photos from iPhone Photo Library to Mac.
What is iPhone Camera Roll?
iPhone Camera Roll stores all the photos you have taken with your iPhone. When you take a photo with your iPhone, the photo will be saved in Camera Roll and can only be view on your iPhone.
How to Transfer iPhone Camera Roll Photos to Mac
If you have hundreds of important photos saved on your iPhone Camera Roll but run of your iPhone storage, the best way to do is to back up iPhone Camera Roll photos to Mac or iTunes. Apple itself provides you with several applications to manage or transfer photos from iPhone Camera to Mac. You can transfer photos from iPhone to Mac using iPhoto, transfer iPhone Camera Roll photos via Preview, or back up iPhone Camera Roll photos to Mac with Image Capture.
How to Upload Photos from iPhone to iCloud, Picasa, Flickr, Facebook and Skydrive
When you got some wonderful photos on your iPhone, you might want to share iPhone photos with your family or in your circle. Look no further! Here you will get complete solution on how to upload iPhone photos to iCloud, Facebook, Picasa and other social share platform. Go on reading more details.
- Part 1: Upload Photos from iPhone to iCloud
- Part 2: Upload iPhone Photos to Picasa
- Part 3: Upload Photos from iPhone to Flickr
- Part 4: iPhone Photo Upload to Facebook
- Part 5: Upload Photos from iPhone to Skydrive
Part 1: Upload Photos from iPhone to iCloud
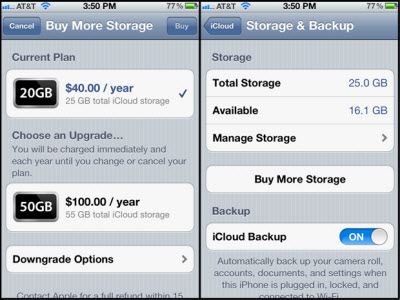
With iCloud, you are able to share data and get online storage. To use iCloud to backup your iPhone photos, you need:
1. Set up an iCloud account. It should be your Apple ID that can backup your iPhone photos to iCloud automatically.
2. Go to Settings on your iPhone and tap iCloud to log in. Then turn on Photo Stream.
3. Set up your iCloud storage plan for the photos. iCloud enables you 5GB storage free of charge, but you can get more space with an annual fee. Tap Done to return to the iCloud settings screen.
4. It will upload iPhone photos to iCloud once you take a new photo with iPhone.
Part 2: Upload iPhone Photos to Picasa
Google+ allows you to upload iPhone photos to Picasa and share them with your Google+ friends.
The steps to upload photos from iPhone to Picasa can be simple by email.
Go to Picasa to set up your Picasa account to allow you to upload iPhone photos to Picasa.
![]()
Then log in your Picasa account and click gear icon to open General tab. Now check the option of “Allow me to upload photos by email”.

And save the email account on your iPhone. Then you can just email iPhone photos to Picasa.
Alternatively, you can download Picasa app on your computer. And transfer photos from iPhone to computer. Then log in Picasa and upload photos from local folder on your computer.
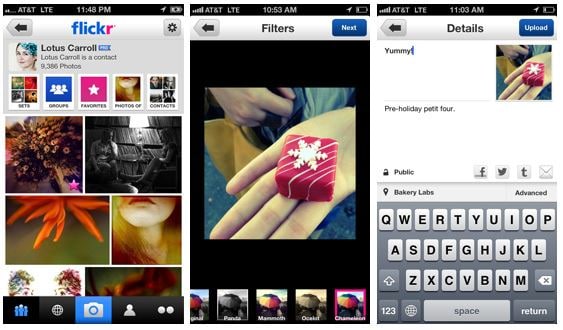
Part 3: Upload Photos from iPhone to Flickr
Flickr allows you to upload photos from iPhone to Flickr easily. You can upload iPhone photos directly with Flickr app, or you can do that via email.
Step 1. Download Flickr app on your iPhone from App Store and create a Flickr account.
Step 2. On your iPhone, open your Camera Roll or any albums. Then choose the photos you want.
Step3. Tap share button and find Flickr. Log in Flickr account and share iPhone photos to Flickr.
To upload photos from iPhone to Flickr using email could be as easy as sending any email from iPhone.
Part 4: iPhone Photo Upload to Facebook
Got many interesting photos on your iPhone and want to upload them to Facebook and share in your circle? Things can be easy, since you can have a handy Facebook for iPhone app to upload photos.
Step 1: Download Facebook for iPhone app on your iPhone and log in your Facebook account.
Step 2: Slide the screen to the right side and you will get several options.

Step 3: Tap on Photos and go to your Camera Roll or choose any albums to select photos.
Step 4: Writing something to descript your photos and tap Post. Your iPhone photos will be uploaded to Facebook.

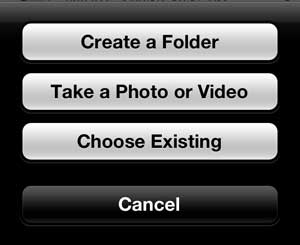
Part 5: Upload Photos from iPhone to Skydrive
Skydrive is a cloud-based app from Microsoft allowing you to upload or sync files for storage. Then you can access the files from Web browsers or devices. So how can I upload photos from iPhone to Skydrive? Here is the process:
Install Skydrive on your iPhone and set up a Skydrive account.
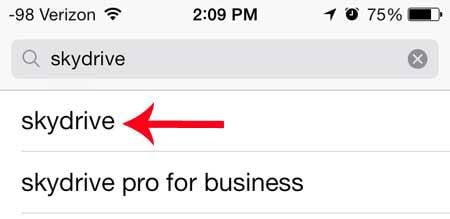
Open Skydrive and go to Files > Share > Add Items. Then you can choose to upload new token photos or upload existing photos from your albums. Select the photos you want and tap Upload. Done!
Upload iPhone Photos to Picasa
Google+ allows you to upload iPhone photos to Picasa and share them with your Google+ friends.
The steps to upload photos from iPhone to Picasa can be simple by email. Go to Picasa to set up your Picasa account to allow you to upload iPhone photos to Picasa.
![]()
Then log in your Picasa account and click gear icon to open General tab. Now check the option of “Allow me to upload photos by email”.
And save the email account on your iPhone. Then you can just email iPhone photos to Picasa.
Alternatively, you can download Picasa app on your computer. And transfer photos from iPhone to computer. Then log in Picasa and upload photos from local folder on your computer.
Upload Photos from iPhone to Flickr
Flickr allows you to upload photos from iPhone to Flickr easily. You can upload iPhone photos directly with Flickr app, or you can do that via email.
Step 1. Download Flickr app on your iPhone from App Store and create a Flickr account.
Step 2. On your iPhone, open your Camera Roll or any albums. Then choose the photos you want.
Step 3. Tap share button and find Flickr. Log in Flickr account and share iPhone photos to Flickr.
To upload photos from iPhone to Flickr using email could be as easy as sending any email from iPhone.
iPhone Photo Upload to Facebook
Got many interesting photos on your iPhone and want to upload them to Facebook and share in your circle? Things can be easy, since you can have a handy Facebook for iPhone app to upload photos.
Download Facebook for iPhone app on your iPhone and log in your Facebook account.
Slide the screen to the right side and you will get several options. Tap on Photos and go to your Camera Roll or choose any albums to select photos. Writing something to descript your photos and tap Post. Your iPhone photos will be uploaded to Facebook.
Delete Photo Stream Photos
Delete iPhone Photo Stream can be as easy as a breeze.
On iOS device, open Photo app and tab Photo Stream.
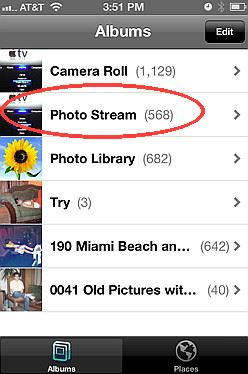
Select one photo or multiple photos. Press the Delete button to remove the photos.

Once the photos are deleted from My Photo Stream on one iOS device, iCloud will automatically delete them from other devices.
Delete iPhone Camera Roll
To delete photos from iPhone Camera Roll, you can handle this directly on your iPhone. Just select a photo or more photos and press the Delete button to delete iPhone Camera Roll photos.
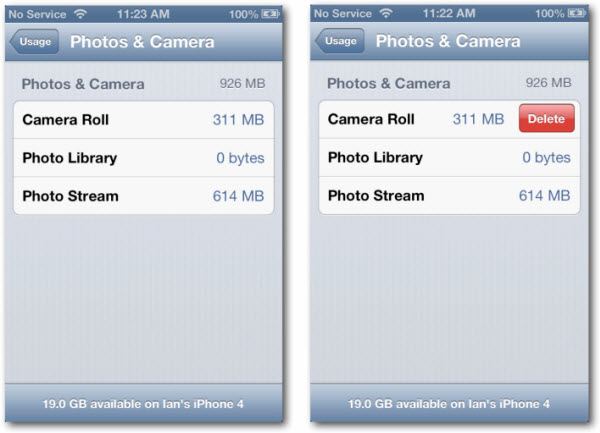
If you want to delete the entire iPhone Camera Roll,
Open Settings on your iPhone. Go to Usage and tap Photo & Camera. Then enter Camera Roll and press Delete to clear iPhone Camera Roll.
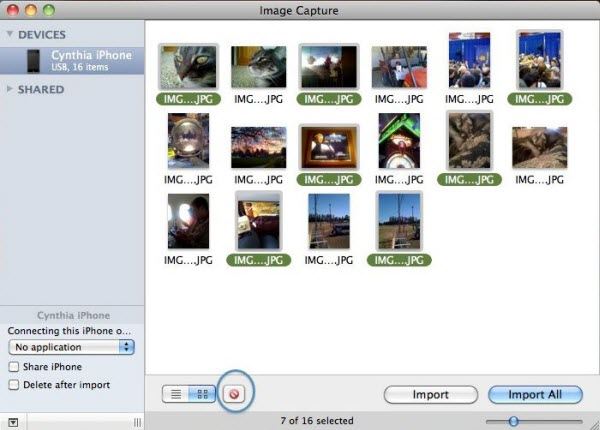
But if you want to delete specified photos from Camera Roll, it is not user-friendly to select the photos one by one from your iPhone. While you can do that by using Image Capture:
Connect your iPhone with Mac. Close iPhoto if it launches automatically. Open Image Capture and directly choose the photos you want to delete. Click the Delete icon to delete iPhone Camera Roll photos.
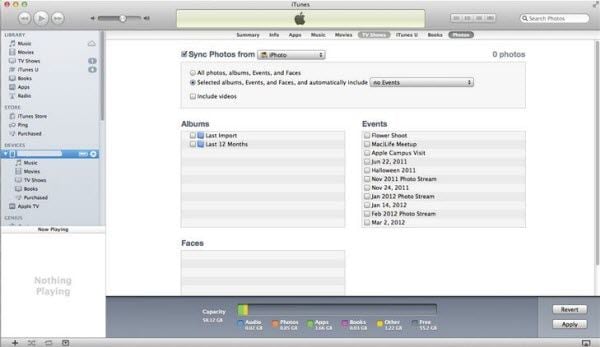
iPhone Delete Photo Library
Photo Library contains photos that are synced from your computer via iTunes. Apple only allows you to delete photos on Camera Roll, but not on Photo Library. If you want to delete Photo Library on iPhone, you can:
Connect your iPhone to you computer and launch iTunes. Go to Devices > your iPhone name on the left pane of iTunes home page. Click Photos and uncheck the option of “Sync Photos from”, then click Apply. All your photos on iPhone Library will be removed automatically.