


Whether you want to explore the steps to video record yourself while delivering a PowerPoint presentation in front of virtual people or report data to the team by preparing a presentation, you will always benefit when you record PowerPoint presentations with video.
There are two methods to record PowerPoint as a video. You can use both audio and webcam to record a presentation. The methods are:
- Incorporating audio into the presentation slide and exporting it in video format.
- Leveraging a screen recorder tool to record yourself while presenting the PowerPoint slides.
Among these two choices, the latter one involving a screen recorder is a highly effective and result-driven option. As screen recording ensures a similar real-time experience that makes the presentation more lively and engaging, the viewers will never remove their eyes from your slides.
In this article, you’ll learn the most popular and preferred ways to record PowerPoint as a video. Before jumping into the steps, you can also explore why recording your presentations as a video is beneficial. So, let’s start.

In this article
When Will You Need to Record a PowerPoint?
If you’ve decided to record PPT as video, you’re on the right path, as it has several benefits.
The primary advantage of recording a presentation as a video is that every slide will be accessible for independent recording. It will let you rectify any mistakes or errors instantly. Plus, editing the content on the slide becomes simpler if you need to change them in the future.
If you’re a teacher providing online lessons or teaching remotely, you will find it beneficial to video record in PowerPoint. You can easily post your PPT on your course management system, school website, YouTube channel, or personal blog by converting your PPT to a video.
How to Record a PowerPoint Presentation With Video and Audio
Video recording PPT has become easier and quicker with the advent of the many advanced video and screen recorders. You can easily record yourself presenting the slides by using your desktop or laptop along with its webcam and a microphone.
Of course, you can record the presentation as a video using PowerPoint itself, but recording via a screen recorder is still an ideal choice. In this section, we’ll cover them both. So, read till the end.
1. Using PowerPoint
When you record audio in PPT, each component (animation, timings, pointer movements, narration, and more) gets saved automatically in the PPT presentation. So, essentially, the PowerPoint presentation turns into a video that can be viewed and enjoyed in PowerPoint itself.
Typically, you get two choices to convert your PPT into a video. You can either save your PowerPoint to a video file format or as a PowerPoint Show file. This section will only focus on recording presentations using PowerPoint and saving it as video files. Here are the steps on how to record:
Step1 Explore and hit the ‘File’ menu → Click on ‘Save’ to ensure every latest change is saved in the PPT format.
Step2 Tap the ‘File’ button → Click on the ‘Export’ option → Start making a video.
OR
You can navigate to the ribbon’s Recording tab and hit the ‘Export to Video’ option.
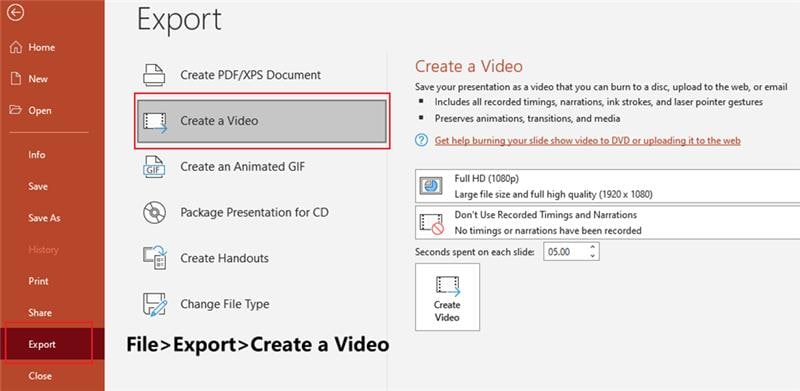
Step3 If you look beneath the ‘Create a Video’ header, you’ll find a drop-down box. Go there and choose the video quality that aligns with the finished video’s resolution. The better the quality, the larger the video file size.
Here’s a table to determine which resolution is best for what:
| Choices | Video Resolution | For Visual Display On |
| 480p - Standard | 852 x 480 (small) | Portable gadgets like smartphones |
| 720p - HD | 1280 x 720 (medium) | DVD and Internet |
| 1080p - Full HD | 1920 x 1080 (large) | HD Screens and Computer |
| 4K - Ultra HD | 3840 x 2160 (large) | Large screen monitors |
Step4 You’ll find another drop-down box underneath the same ‘Create a Video’ header. It will let you know whether there’s any timing and narration added to your presentation or not.
Step5 Once done, select ‘Create Video.’ You must fill in the file name for the video on the File name box. Next, navigate and find the folder consisting of this file. Finally, hit the ‘Save’ button.
Step6 Select Windows Media Video or MPEG-4 Video from the ‘Save As’ type box. Go to the screen’s bottom and keep an eye on the status bar to monitor the development of the video. Based on how long the film will be and how intricate the PPT will be, it could require a few hours to create.
Hint: You can schedule a lengthy film to be produced the following day. This will ensure that it is prepared for you by the next morning.
Step7 Navigate to the specified file location, click on the file twice, and afterward playback your freshly produced video.
Pros and Cons of Using PowerPoint to Record a Presentation With Video and Audio
What’s the Best Way to Record Your PowerPoint Presentation?
Things become really uninteresting, bland, troublesome, and hectic when you record presentations as videos using PowerPoint. This is where a third-party tool comes to aid.
The best way to record your PowerPoint presentation as a video is by using the ‘state-of-the-art’ third-party tool - Filmora. This software solution has emerged as the leading preference for video recording and editing requirements.

Recommendation: Filmora Video Editor
- Best video editing software for beginner and semi-professional, that comes with powerful editing skills like trimming, splitting, rotating, editing, etc.
- Advanced video effects like green screen, PIP, audio mixer, etc. can also be found and applied to your video within few clicks.
- 500+ free special video effects to customize and create an awesome movie by yourself.
- 1000+ standalone effects downloading resources to make videos in all kinds of styles.
- Export videos to Chromebooks compatible format with 1 simple click.

This simple-to-use software will help you record a PowerPoint presentation in no time and without any hassle. What makes this way unique from other methods is its wide range of features to help you record audio and video.
Here are all the steps involving the use of a third-party app like Filmora to record your PPT presentations:
Step1 Install the Filmora Software Application

Since it offers straightforward all-inclusive video recording and editing options, you likely installed this application. If you’re not, now is the perfect moment to get it without any problem.
You can start it immediately from your computer once the installation and updating processes are complete. Wondershare Filmora has multiple ways of making a presentation video as one of its specialties, including:
- By adding your video files
- By capturing the display on your display
Step2 Record PPT Presentation By Incorporating Audio
Under this step, you can easily do the settings by yourself and do not need any special knowledge. You just have to fit the recording button and in the recording interface, you need to enable the microphone and Webcam settings. To help you have a good understanding, take a look at these points:
1. Launch Filmora> Click Screen Recorder
Go to the Filmora website. Navigate and find the ‘screen recorder’ option. You’ll find it right below the ‘Create New Project’ option. Simply click on it.

2. In Wondershare Screen Recorder
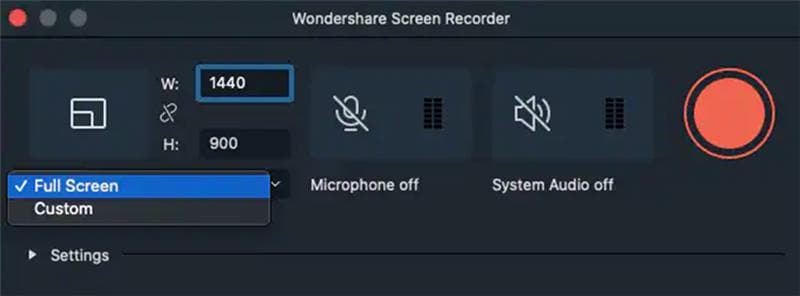
The Wondershare screen recorder page will appear on the screen. There you’ll find the ‘Settings’ option. Click on it and the screen will display two further options: Custom and Full Screen.
Select whichever you want. Let’s say you clicked on ‘Full Screen.’ Then, open the microphone and switch on the system audio. Finally, hit the red button on the screen to get started.
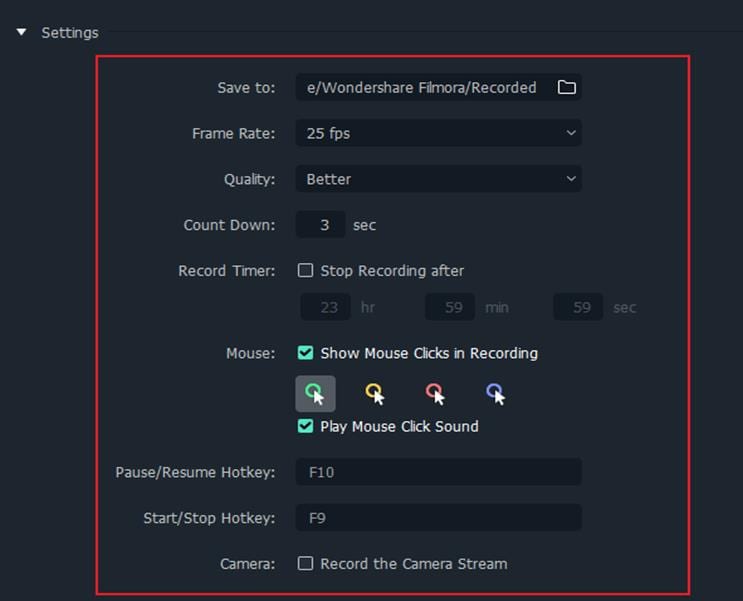
3. Change Settings
The screen will display numerous customization options if you select the ‘Custom’ option. You can change the quality, frame rate, countdown, and more as per your requirements.
4. Start to record the screen
Now, you’re all set to record the screen without any hassle. In addition, the platform enables you to stop the recording anytime you want with the shortcut key - F9.

Step3 Time for Your Presentation Video to Undergo the Editing Process
From video recording to video processing, this Wondershare solution is the center of essential and major editing capabilities you would need in any assignment to fulfill your needs.
Wondershare Filmora’s video recording solution contains many built-in tools that may be used in production work. It performs well with simple setups, and considers a simplified layout to elevate your recordings using its powerful editing options.
Step4 Once All is Done, Export
After finishing the informative video’s compilation and finishing, you may now store it for sharing on social media. Here on the move, Filmora enables embedding-sharing services like YouTube. It is possible to save the file in the following formats: MP3, GIF, MOV, AVI, WMV, and MP4.
For more insights, explore this video:
FAQs
1. The PowerPoint recording function is only supported on desktops?
No, the PowerPoint recording function is available on both desktops and mobiles. However, it works well and ensures maximum efficiency on desktops only.
2. How can I record PPT as video on an iPad or smartphone?
There are varied approaches to recording PPT on iPad and phones. For now, let’s check the way to record PPT on your iPad device:
Step1 Press the Play key.
Step2 Let your finger swipe down the screen, starting from the upper right corner.
Step3 It then shows the Control Center.
Step4 Hold down on the Record option to see screen recording choices.
Conclusion
Presentations are the preferred method of delivering supplementary information that helps viewers recall and associate with the concepts and notions discussed in a program in study sessions and conference halls alike.
In general, PPT presentations used in isolation, without the need for comparison shows, are inadequate and poorly communicate the concepts from the actual show. As a result, we advise choosing Filmora as a solution because it is convenient and has many functions.


