


Separating audio from video is easy as it gets, especially if you have the right tool for the job.
Video editing is all about being flexible, and this adaptability is tested as you split audio from video segments for whatever reasons.
Maybe you want to remove background noise from the video, or perhaps you want to extract an audio version of a popular song but can’t find the right tool. So, what can you do about it? Well, the best, easiest and free way to do this is to find a video extractor straight from the internet.
They allow you to download, separate, and extract audio from a video file, making it look reasonable. That’s why today, we will be learning some best tools to split audio from video tracks into different channels so you can use them for later projects.
We will also go through Sony Vegas split audio from the video tool and try to understand how you can control and manipulate the sequence independently. So, let’s get straight into it!
Part 1. Best Video Editors to Split Audio From Video
Now, if you have a video file and you just want the audio from the file, you have to get yourself a video editor. There are some great editing tools in the market, each with its own set of features that you can rely on. Here are some of them that we personally recommend.
Davinci Resolve
Davinci Resolve is a professional-grade video editing and post-production software that lets you create hyper-realistic visuals. This program is super-easy to understand and can tackle everything from assembling your first draft to node-based color grading.
Their paid version is the cheapest out of the bunch, and they even offer a free version that won’t include certain features but is still very capable. On top of that, Davinci is extremely reliable. You can throw your 4K footage in it, and there will be no dropped frames.
Even their shortcut keys can be exported from other programs such as Premier Pro for ease of the user.
Supported operating system
- Windows
- Mac OS
- Linux
Price
- $299 one time + Free Version
|
PROS |
CONS |
|
✅An immersive interface with seven sections |
❌Not as popular as something like Premiere Pro |
|
✅Importable sound library |
❌You can’t expand the timeline to fill in your screen |
|
✅Automatic scene cut detection feature |
|
|
✅Live saves and backups enabled |
How to Separate Audio from Video in Davinci?
Davinci Resolve split audio from video as long as you know where to start. Here is a step-to-step guide through which you can archive this.
STEP 1: Download the Latest Version of Davinci & load Your video
1) First, go to Blackmagic’s official webpage, scroll down and click “Install” on Davinci Resolve.
2) A pop-up window will open, asking for your OS and the software’s version (free or paid). Once chosen, the download will start.
3) Now import the video into a new project in the app. All you need to do is left-click the window to access this option.
4) Next, drag and drop the video sample into the timeline so you can split the video and audio.
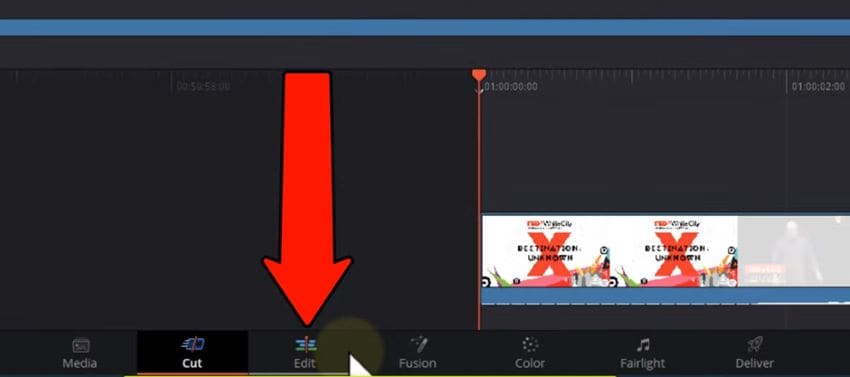
STEP 2: Separate the Video from Audio in the Timeline
1) Select the “Edit” mode, which will typically be located near the bottom left corner.
2) Choose either the video or audio by right-clicking and unchecking “Link Clips”.
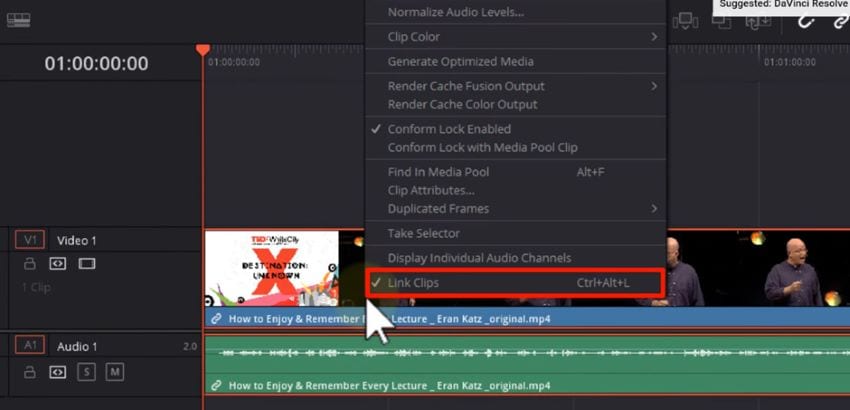
Now both your audio and video should be separated, making it easier to move around.
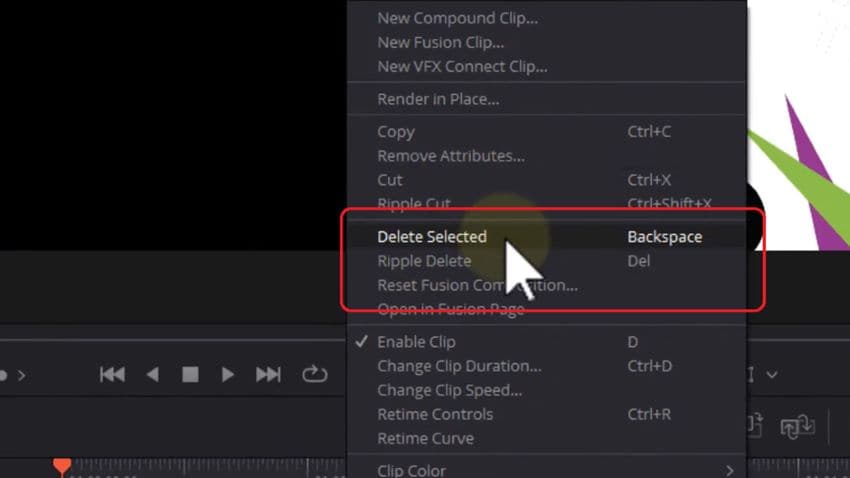
STEP 3: Remove Either the Video or Audio from Your Media
1) Once you’re done, select either the video or audio track, left-click and choose “Delete Selected”. You can also use the backspace key for quick access. With this, our Davinci resolves separate audio from video tutorial concludes.
Want to create split-screen videos for YouTube? Click here
Sony Vegas
Sony Vegas is tried-and-true editing software that has made its name in the industry. Released in 1999, it still has a lot of potentials to customize your videos and slideshows and make them appear presentable.
Whether you’re an amateur or a professional user, Sony Vegas has something for everyone. You will be quite surprised by its amazing audio effects as well as an advanced transition that still stands the test of time.
Currently, it’s available in its pro version, which provides features for modern-day editing needs. Its pricing starts at $16 per month with a slight discount on annual subscriptions.
Supported operating system
- Windows
Price
- 30-day trial period after which $16/month
|
PROS |
CONS |
|
✅ It runs easily on most systems due to lesser hardware dependency |
❌Crashes are a lot more common |
|
✅ Intuitive tools and UI |
❌It still lacks certain advanced features |
|
✅ Lack of sophisticated key-frame animations |
|
|
✅ Royalty-free audio and video assets |
How to Separate Audio from Video in Sony Vegas?
Vegas pro separates audio from video like most of the editing tools in the market. Following is a step-to-step guide on how it makes this possible.
STEP 1: Install Sony Vegas in Your system and Launch the App
1) Before starting the whole process, head to their download page and get yourself an authentic copy of Vegas pro.
2) Once you’ve chosen your package, the download will start automatically. So, launch the app after it’s done.
STEP 2: Use Sony Vegas Split Audio from Video Shortcuts
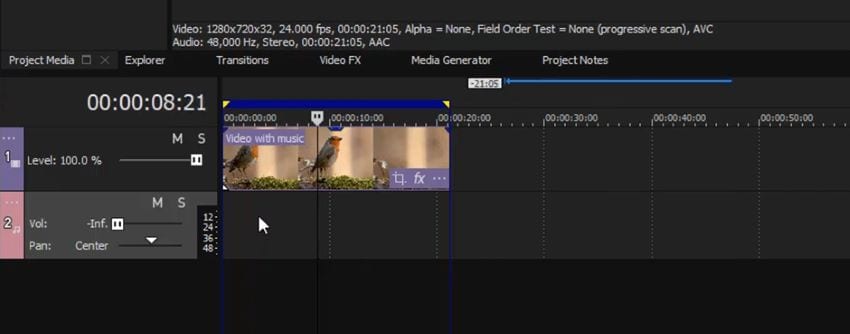
1) Now import the video file as you did in the case of Davinci and drag and drop it onto the timeline.
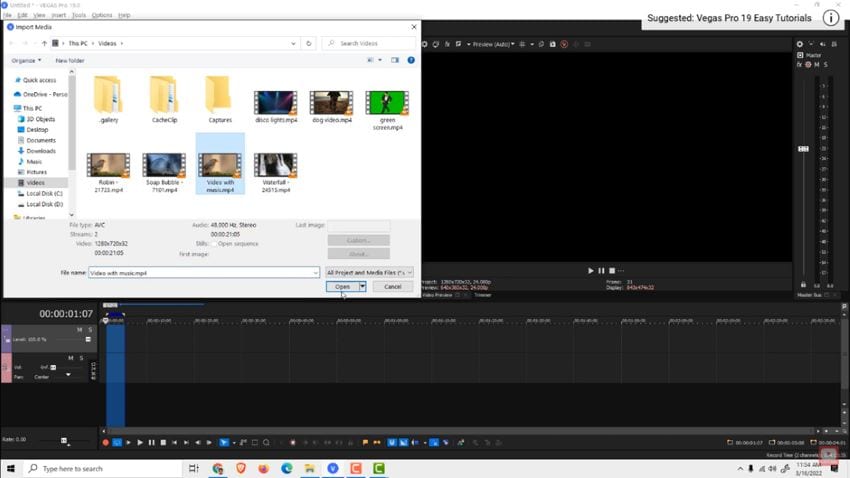
2) After that, select the video from the timeline and press and hold “Ctrl + U” or simply “U”. This will split the video and audio, which you can then remove completely by using the “Delete” key.
If the shortcuts are not working, you can also do the whole process manually. Just right-click on the clip, then “Group”>“Remove From.” As it’s ungrouped will be able to delete it now.
Filmora - The Best Alternative to Modern Editors
When it comes to video and audio editing, you need software that isn’t too complicated. This is when Wondershare Filmora truly shines.
Unlike Davinci and Vegas pro, it separates audio from video without much technical knowledge. The whole process is quite straightforward, and everything is embedded right within the timeline.
This is the reason why it’s one of the leading media editors on PC. In terms of the overall interface, it’s quite intuitive, and there are powerful tools built right into it.
This can range from advanced transition effects to dozens of filters and color grading options. Everything in Filmora runs smoothly, and your render times are ridiculously quick since it’s fast software.
Whether you’re an intermediate or just starting out, Filmora has something to offer to everyone. It’s a unique, simple, and easy-to-use editing tool that you should definitely try.

Recommendation: Filmora Video Editor
- Best video editing software for beginner and semi-professional, that comes with powerful editing skills like trimming, splitting, rotating, editing, etc.
- Advanced video effects like green screen, PIP, audio mixer, etc. can also be found and applied to your video within few clicks.
- 500+ free special video effects to customize and create an awesome movie by yourself.
- 1000+ standalone effects downloading resources to make videos in all kinds of styles.
- Export videos to Chromebooks compatible format with 1 simple click.
Supported operating system
- Windows 64-bit
- Mac OS
- Android
Price
- Free + Paid version ($62 per year)
|
PROS |
CONS |
|
✅Comes provided with an audio mixer |
❌ Free version will be limited |
|
✅Royalty-free music library |
❌ Lacks some advanced options |
|
✅One of the best audio-video separation tool |
|
|
✅Eliminates background noise |
How to Separate Audio from Video in Filmora?
The process of separating audio and video in Filmora is as easy as it gets. You just need to import the video into the timeline and use “Split Media.” Here is a brief rundown on how you can do that.
STEP 1: Get a Copy of Filmora From their Website
1) First and foremost, install the standalone version of Filmora by visiting the download page.
2) After successful installation, you need to launch a new project.
STEP 2: Load the Clip & Drop it onto the timeline
1) Click “Import Files” and look for the video you want to slit audio.
2) Now, you can either select “Add Project” or simply drop the clip in the timeline, and it will be ready to be modified.
STEP 3: Enable the Audio split action for the Clip
1) To split or extract the audio, select the clip from the timeline and right-click it. Now move to the “Detach audio” option and enable it.
2) You can also use the shortcut “Ctrl+Alt+D” and save even more time.
STEP 4: Export the final Clip to your system
- Once you’ve added the new background music for your clip, hit “Export” and save the file in whatever format you desire.
Watch this video to see how to split audio from video using Filmora in just a few easy steps.
这里插入视频 Video Tutorial
Part 2. Best Online Tools to Split Audio From Video
Video editors are great tools that you can use to split video and audio, but the real question is, are they truly needed? Well, the answer is no, as several online tools are available at your disposal that perform the same function without any strings attached.
This saves you precious time & resources and also makes your system more secure. These are some of the online tools that we think will work the best.
Pazera Free Audio Extractor
Pazera is a completely free and open-source audio extractor. It works by separating video files from their audio and saving them directly onto your local directory. You can use this tool to extract audio in several formats, including MP3, AVI, VOB, FLV, and the list.
It even allows you to modify the sampling volume as well as the bitrate to make it sound more unique. So, set a profile in Pazera today and start using your favorite audio files.
|
PROS |
CONS |
|
✅Works as its intended |
❌Its only compatible with Windows |
|
✅ Converts several known audio and video formats |
❌Its interface can be a bit complicated for beginners |
|
✅ Allows you to adjust the bitrate |
|
|
✅ Extracts audio in seconds |
How to Separate Audio from Video in Pazera Free Audio Extractor?
STEP 1: Open Pazera and Upload a new Video File
1) Launch Pazera Audio Extractor from your desktop. You can get the original version from pazera-software.com.
2) Now select “Add Files” and choose from the list of media that you want to extract audio from.
STEP 2: Set an Audio Profile and Use Advanced Features if Needed
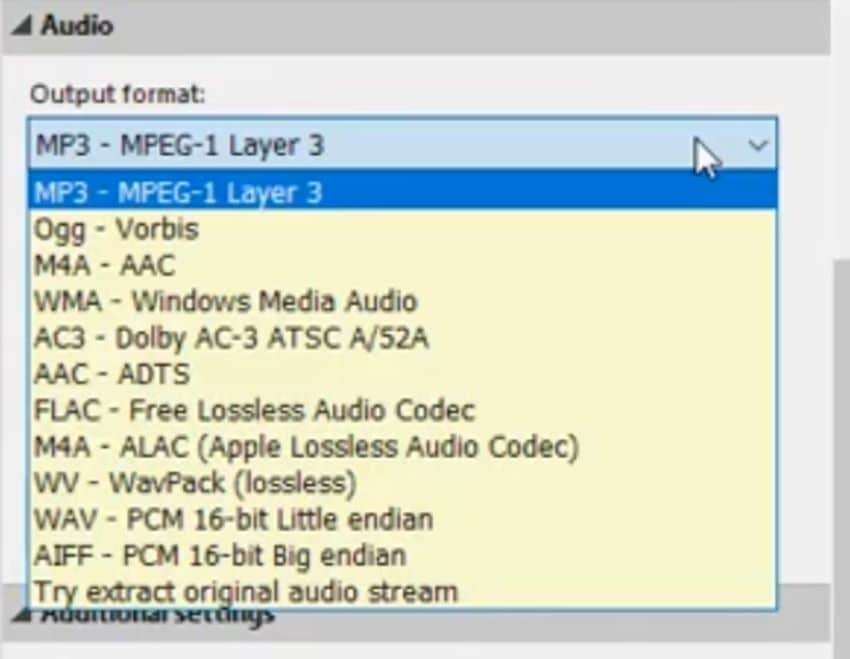
1) Once the file has been loaded, double-click it, which will open several options.
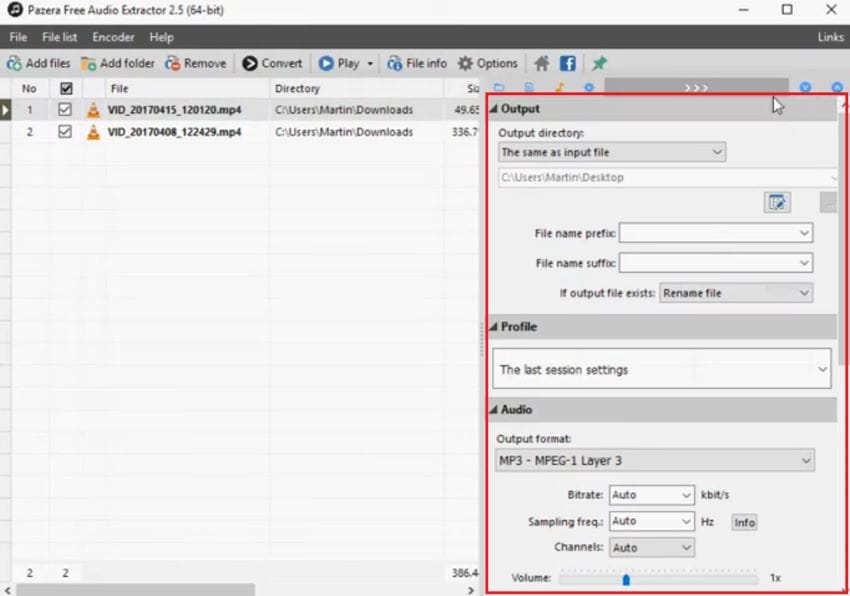
2) Leave everything as it is and move to the “Audio” section. Here you can change the final format as well as bitrate and volume. Make the necessary changes if you want; otherwise, the default settings will be applied.
STEP 3: Convert the Audio File to a Known Directory
- After you’ve finalized the parameters, head over to the top corner and hit “Convert.” On average, it will take a minute or so before the final audio is extracted.
Audio Extractor Online
Now this one is an online sound extractor by 123apps. It allows you to convert your video file to audio format without paying a single penny. It’s completely free, has a simple interface, and the best part is that you don’t have to install it in your system. It works as long as you have an internet connection. Furthermore, it supports a number of audio formats so you can have a high-quality experience.
|
PROS |
CONS |
|
✅No download is required |
❌Its too simple, and you have to rely on the server |
|
✅Supports every type of user with zero editing skills |
❌You can change or remove background noise |
|
✅ Provided with several audio outputs |
|
|
✅Easy to understand layout |
How to Separate Audio from Video in Audio Extractor Online?
The whole process is pretty much self-explanatory on the website. However, for convenience, these are the steps you need to follow.
STEP 1: Upload Your Video Clip straight to the Website
STEP 2: Choose from Different Audio Outputs
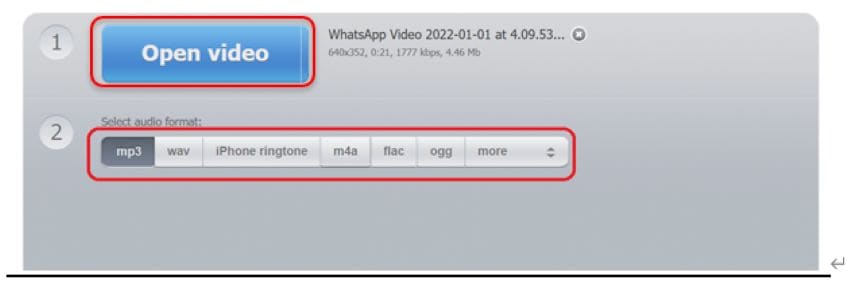
Try out these different formats to find the perfect match for your clip
STEP 3: Extract the Audio Clip to Your PC or Mobile

VLC Player
Like Pazera, VLC is an open-source project designed to view, edit or compile your media files. There are no subscription plans or annoying ads in VLC, and everything is present right in the software. It even lets you extract video and audio formats and save them in your Windows directory.
It’s also compatible with DVDs and VCDs, so you, as a user, can have an easy time setting up your streaming protocols. Currently, they’ve updated the program to the latest Windows 11 version. However, you can get yourself an older version if that’s what your PC supports.
|
PROS |
CONS |
|
✅Totally free of cost |
❌Audio extraction depends on video length |
|
✅ Innovative interface |
❌It’s a bit different than other extraction tools |
|
✅Safe and compatible audio extractor |
|
|
✅Fast progress with hundreds of guides |
How to Separate Audio from Video in VLC Media Player?
STEP 1: Load the Video File in VLC Media Player
1) Once you’re in the VLC media Player, move your cursor to the top left corner and choose “Media.” Then scroll down and open the “Convert” section.
2) A pop-up window will open with an “Add” button. So go ahead, select it, and then upload your video file with audio.
STEP 2: Convert the Video file and Choose a Specific Destination
1) Once the video has been selected, hit “Convert.”
2) Keep the top options unchanged while dragging down the profile and look for a format named “Audio-MP3”. Once that’s done, choose the destination of your save file and hit “Start.”

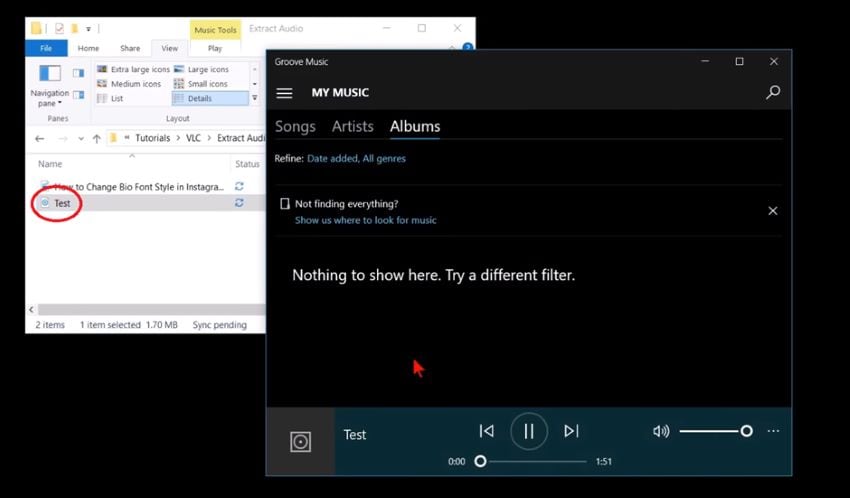
STEP 3: Re-check Your Extracted Audio File from the Directory
1) Open you’re allocated directly. From there, you will see both your original video and extracted audio.
Final Thoughts
So, this concludes our guide on some of the best ways to split audio. At the end of the day, it really boils down to your personal needs on which editor or tool you should use to separate audio and video. If budget isn’t a concern and you want something professional, then Filmora is a great pick.
It comes with a number of advanced tools and tries not to be too complicated. Even thousands of guides and tutorials are available for Filmora, making it the best choice for someone just getting their feet wet with video-audio editing.
With that said, be sure to check out the above software if you are looking for some audio split.


