


Transferring a playlist from your iPod to computer means that you are transferring the compilation of different songs which can be played on a particular occasion. If you have hundreds of music tracks on your iPod and want to listen on the selected one, you can compile a list of all these tracks to play them smoothly on your iPod. There is no way on the iPod by which you can make new playlists, however, if you already have some playlists on your iPod, you can add music to these playlists. In other words, Playlists are kind of preferences which are not so easy to set for everyone. Here’s how you can transfer the Playlists from your iPod to computer or your iTunes Library:
Part 1. How to Transfer Playlist from iPod to Computer via iTunes
Step by step guide to transfer playlists from iPod to iTunes Library via iTunes:
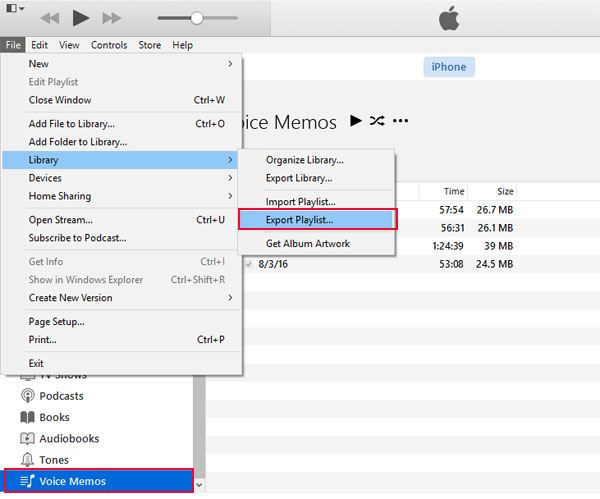
Step 1. Connect your iPod to the computer and Launch the latest version of iTunes on your computer. Click on the little arrow button in the top menu and select the Show Menu Bar. Now, Click on the icon of your device which is shown under the Menu bar.
Step 2. Find your Playlists and select it as shown in the screenshot below. Now, Go to the menu bar and click on File, Library and Export Playlist. Now, it will ask you to set the location of the folder for Playlist.
That’s it! You have successfully exported the music file from your iPod to the computer. Actually, this playlist is saved in the form of the text file which can be imported back to iTunes to get the whole playlist. Click on the Music icon right next to your iPod. Now, Click on the File, Library and Import Playlist. Select the recently exported Playlist and click on Open.
Part 2. Copy Playlists from iPod to Computer with Tunes/Play Counts/Rating (Recommended)
Now, you will see the whole playlist present in the music library of the iTunes. Although this method seems pretty much easy to transfer the playlist from your iPod to the computer, there are several disadvantages of using this method. The playlist only have the directory while there will be no actual songs in the exported library. In other words, if a song is deleted from the iTunes Library on your computer, you will not be able to play it in the Playlist in iTunes. To solve the problem, you need to have the better solution – dr.fone.
dr.fone - Copy iPod Playlists to Computer with Tunes
dr.fone will allow you to transfer the Playlists from your iPod to the computer with the tunes, play counts, ratings as well as the artwork of the songs. In other words, dr.fone will transfer every other information associated with a song from your iPod to the computer. Also, users can also transfer the smart playlists or Genius playlist from the iPod to computer or the iTunes Library without using the iTunes.
Step by Step guide to transfer playlists from iPod to computer using dr.fone
Step 1. Download and install dr.fone, get the latest version of the software from the links given below. Run it and connect your iPod with the computer with USB cable to your computer.
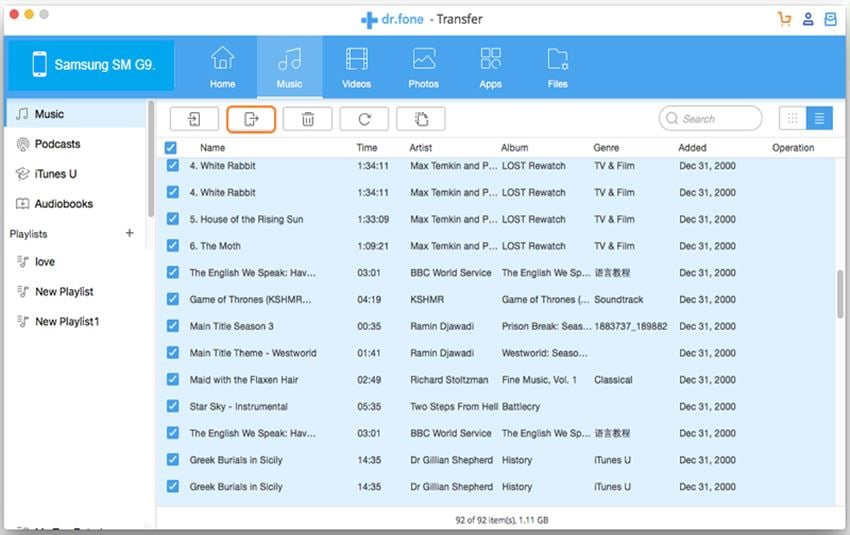
Step 2. Click on the "Music" tap on the top of the main window. The music on your iPod will be displayed on dr.fone. In the left side menu, it will show all the playlists from your iPod. Now, right click on the playlist that you want to transfer to computer, and click "Export" to export the whole playlist to your computer/iTunes. Or you can directly choose the playlist and click "Export" at the top to complete this process.
As I have mentioned, during the transferring profess, the playlist play counts, ratings and artworks will be copied to your computer as well. Most important, all the playlists come with tunes, in this case, you’ll never worry about the songs gray out in playlists. Why not download dr.fone to have a try now.


