


There are several reasons why someone may want to upload pictures on iPad. It could as a result of a backup, changing from old device to a new iPad or even the preference of seeing pictures on iPad due to its size. Whatever the reason, there are several ways to upload your photos to iPad as we shall see in this article.

If you have some beautiful photos that you want to upload to your iPad from any other iOS device, then it is recommended that you use the dr.fone to upload the photos. It is one of the safest and easiest methods of transferring and uploading photos to your iPad. Apart from photos, it can be used to upload other contents to your iPad. It is a very good tool. To upload photos to your iPad from any other iOS device like an iPhone, use the following steps.
Download the free trial version of dr.fone now!
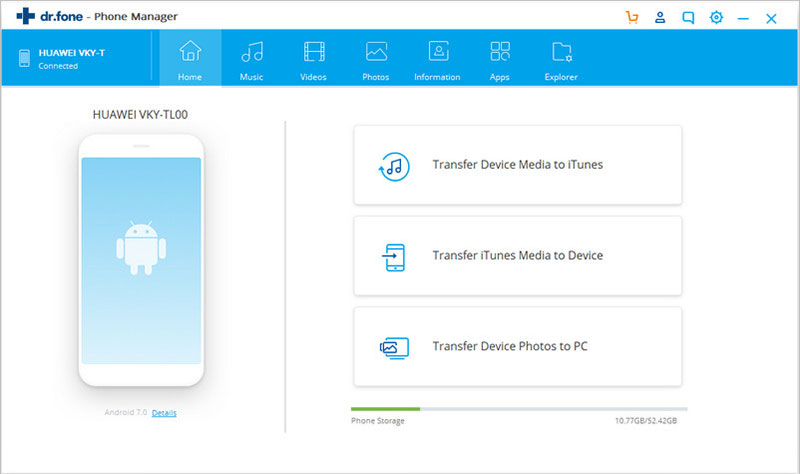
Step 1: Connect your device to computer
You will need to install the dr.fone on your computer. Once this is done, connect your 2 devices to the computer. Please make sure you have selected the source device. The source device should be displayed in the main window.
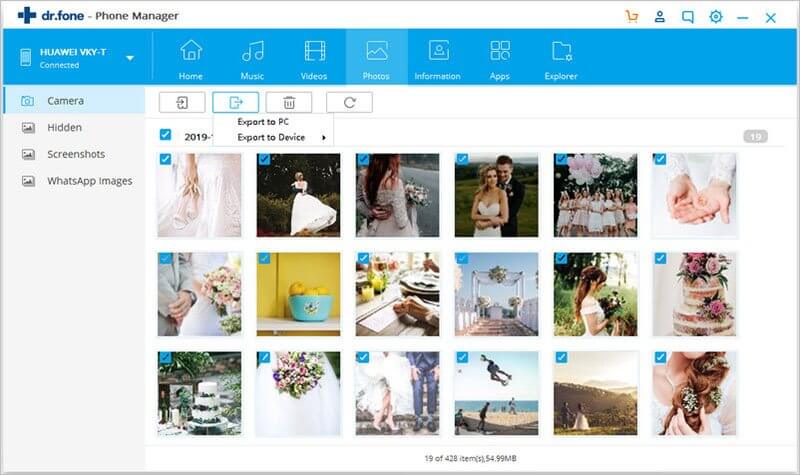
Step 2: Transfer photos to iPad
Click the “Photos” tab on the top of the main window. Next, you can see all photo files are sorted by category and displayed in the sidebar. Click the file type in the left sidebar, then click to select the photos you need to transfer to another device. Click “Export” > “Export to (the name of the second device)”. That’s it!
Part 2: How to Use iTunes to Upload Photos from Computer to iPad
You can upload photos from your computer to iPad by using iTunes. In fact, this is one of the easiest ways if you follow the instructions carefully.
Step 1: The first thing is to create a folder containing photos you will want to upload to your iPad.
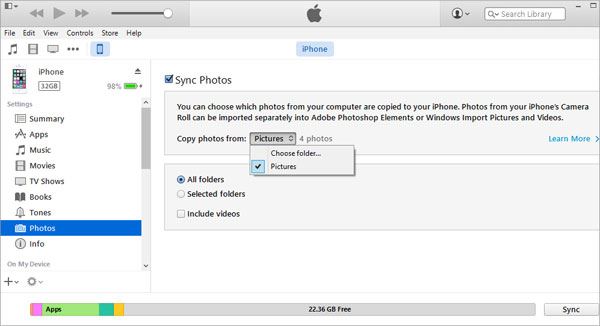
Step 2: Connect your iPad to your computer via a USB cable. When that is done, launch your iTunes on your computer and select the iPad on the list of devices shown.
Step 3: Click on the “Photos” tab, check “sync Photos from” box and then select “Choose folder”. Locate the folder that contains the photos you want to sync which you created earlier. Select it and click “Choose”. You can choose to sync all photos or selected folders.
Step 5: Click on “Apply” to start syncing the photos from your computer to your iPad.
Pros:
- It is easy and simple to use;
- You can sync as much photos as you want;
Cos:
- It requires physical cable connection which may be problematic at times;
- It does not work on all iTunes version;
Part 3: How to Use iCloud Photo Library to Upload Photos to iPad
In fact, iCloud photo library is Apple’s solution to syncing and storing photos across all iOS devices seamlessly. It has eventually replaced the traditional camera roll and photo stream options with a better all photo section. You can upload photos to your iPad from any iOS device with the iCloud Photo Library by following these steps.
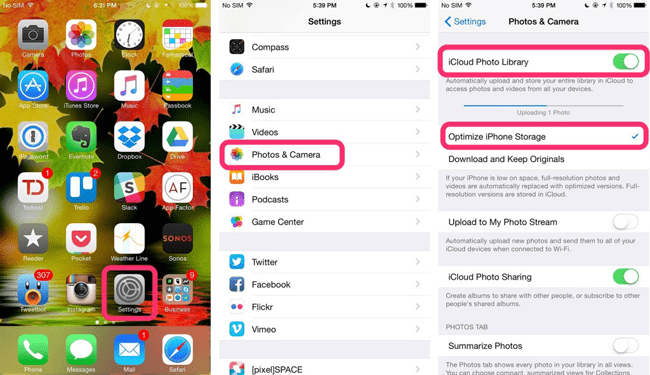
Step 1: Open the settings app on your iPad > select “iCloud” from the menu > Log in with your Apple ID > Go to “Photos” Option >swipe on the “iCloud Photo Library”.
Step 2: Connect your iPad to a wireless network > Open the photos app on the other iOS device > Select ‘All Photos” from the Album > Look for all the photos you want > Tap the “Select” button and send them to shared album.
Pros:
- No need for cable connection required for this process.
- It is simple and straightforward.
Cons:
- Uploading photos could be slow due to network connection
- You must sign in with your Apple ID to use the service.
Part 4: How to Upload Photo from Digital Camera and SD Card to iPad
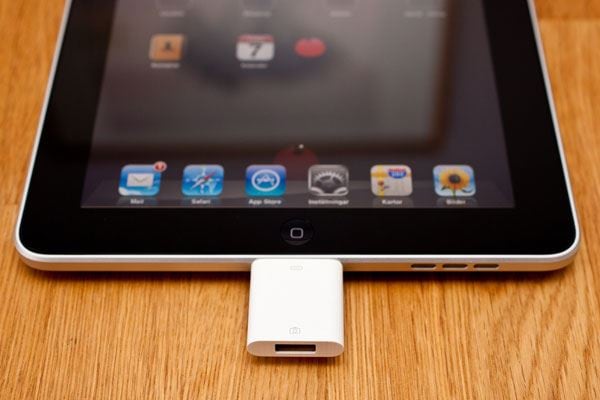
You can upload photos from your digital camera and SD card to iPad using Apple’s camera adapters. To upload photos, follow these steps.
Step 1: Connect the adapter to your iPad > Connect your digital camera to the adapter or insert an SD card > At this point, photos will be automatically opened to the import tab. However, do it manually if it doesn’t > Tap import photos and select the photos desired.
Step 2. You might be asked to delete the media on the SD card or camera when the import is complete
Pros:
- This method can also be used to import videos and other contents to iPad.
- Can upload multiple types of media files.
Cons:
- Cannot upload photos that are copied to the digital camera or SD. Can only import contents that are captured by the digital camera.
- Adapter may not be compatible for all iOS versions.


