


Have bought a new computer, then need to sync iPod to new iTunes Library for migrating all content on iPod to iTunes ? It could be the main reason for people to sync iPod to new iTunes library. However, take care: everything on your iPod might get erased during the process, if you have already sync your iPod with another computer. Never mind, read the following guide to learn how to sync iPod to new iTunes library without erasing iPod data.
Part 1. How to Sync iTunes Store Purchases from iPod to New iTunes Library
Things You Need to Pay Attention to:
1. Whenever you want to sync your iPod with the computer, there are certain things that you should keep in your mind to run this process smoothly. When you connect your iPod with the new iTunes Library, make sure that you have enabled the “manually manage music and videos” on the iTunes. Otherwise, whenever, you will connect your iPod with the iTunes, it will sync all the music, playlists or videos with the iPod. You’re supposed to disable the auto sync in iTunes preferences (Preferences > Devices > check “Prevent iPods, iPhones, and iPads from syncing automatically”.)
2. On the other hand, manually managing iPod will let you select certain tracks or the music videos to transfer to your iPod. You can also disable the auto iTunes startup for the iPod connection. In other words, iTunes will not fire up when you will connect the iPod with your PC. Here’s the complete guide on how you can sync the iPod songs and videos to the new iTunes library.
Step 1. Before you start the sync process, make sure that you have installed the latest version of iTunes on your computer. If not, download the latest iTunes on your computer or click the “Check for Updates” in iTunes (it’s in Help menu for Windows version and for Mac version, it is in iTunes menu).
Step 2. Authorize your computer by clicking the Store menu and choose “Authorize This Computer”. Enter your Apple ID and password.
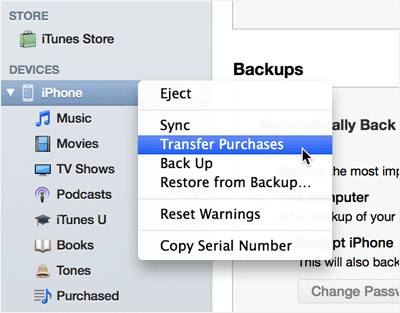
Step 3. Connect your iPod with the computer and run the iTunes. When you will connect your iPod with the new iTunes library, your iPod will appear in iTunes. In iTunes File menu, choose Devices > Transfer Purchases
That’s it! You have successfully synced iTunes Store purchased songs from iPod to new iTunes Library. Please notice that it is only for the iTunes Store purchased songs. Other songs in iPod, including downloaded from music share sites, iPod app or shared from friends are not in the list at all. If you need to sync all content, including music, videos, and playlists from iPod to new iTunes library, try method in part 2.
Part 2. How to Easily Sync Songs/Playlists/Videos from iPod to New iTunes Library (Recommended)
The process of the sync between an iPod and iTunes is not as easy as it seems. You can easily sync the purchased content from your iPod to the new iTunes library. However, if you want to sync the songs that you haven’t purchased from the iTunes, Apple will not let you do that. Alternatively, you will have to use a good software tool to do this kind of work such as dr.fone, a professional tool which is designed to sync music, playlists, videos and more from iPod to new iTunes Library or to a folder on your computer.
dr.fone - the best software to sync iPod to new iTunes
dr.fone provides you 1-click option to sync music from iPod to new iTunes. You can not only sync the music tracks, it will also let you export playlists and the videos to the iTunes library as well. Here are its main features:
- 1 click to sync all music from iPod to iTunes library without generating duplicate songs;
- Allow to sync selected songs/videos/playlists from iPod to iTunes Library;
- Sync playlists from iPod to new iTunes library with artworks, play counts and rating;
- Sync iPod to new iTunes library without and risk of erasing the content on iPod;
Step-by-step guide for how to sync iPod to new iTunes library:
Step 1. Download the latest version of dr.fone on your Windows or Mac and the process of installation is pretty simple. All you have to do is to follow the on screen instructions to install it on your computer. Connect your iPod with the PC and launch the recently installed dr.fone.
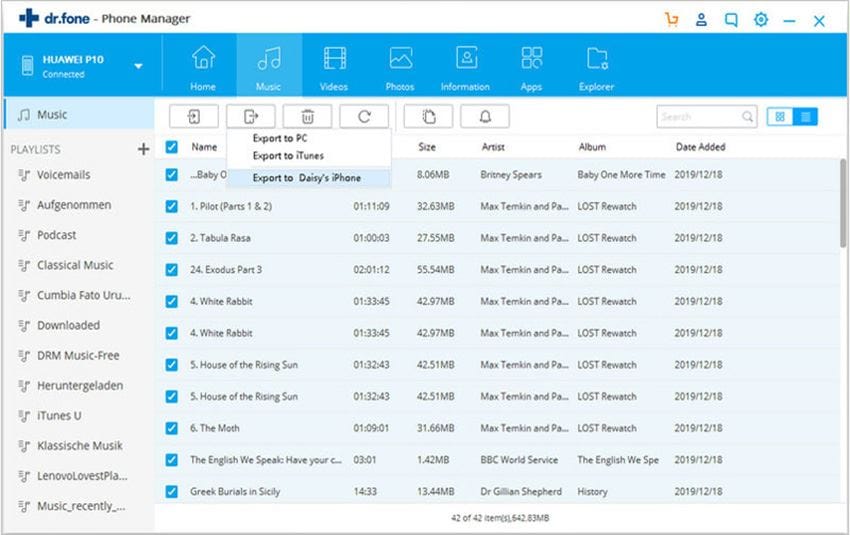
Step 2. For all those users who want to sync the selected songs, playlists and videos to iTunes library, click on the corresponding category for the media file at the top menus, and then select the files > click on the Export button in the top bar and select export to the iTunes.
See, it’s not so hard to sync iPod to iTunes library if you try dr.fone . Besides the above mentioned features, it also allows you to copy songs, videos, playlists, even photos from your computer to iPod for backup in case of you change computer or iTunes library again. Why not download the free trial version to have a try right now?


