The retina display and the big screen of the iPad offers a perfect display to view all your favorite photographs that you have on your device. Taking them from the iPad and storing it on your Mac is a decent action to prevent data loss at any time in the future. We present you with six different ways through which you can transfer photos from iPad to Mac. Of course, choosing the right method depends on your convenience and requirement.
- Part 1: Transfer Photos from iPad to Mac with dr.fone
- Part 2: Use iPhoto to Transfer Photos from iPad to Mac
- Part 3: Export Photos from iPad to Mac via iCloud Photo Library
- Part 4: Transfer Photos from iPad to Mac via Preview
- Part 5: Copy Photos from iPad to Mac via Image Capture
- Part 6: Send Photos from iPad to Mac via Email
Part 1: Transfer Photos from iPad to Mac with dr.fone

Transferring photos from iPad to Mac requires the use of a transferring software. When you surf the internet, you are sure to come up with many programs offering the service. However, it is important that you select the one that has a record of being the number one application. Your research for such a mechanism ends here with dr.fone. The recommended software application gives you the freedom and ease necessary in moving all your photos from iPad to the Mac in a few simple steps.
Download the free trial version now!
To send Photos from your iPad to iPhones, iPad or iPod Touch via dr.fone, kindly follow these few steps.
Step 1: Download the trial version of dr.fone on your Mac or PC. Install the software application by following the onscreen instructions. Before starting the program, connect your iPad to the Mac using the given USB cable.
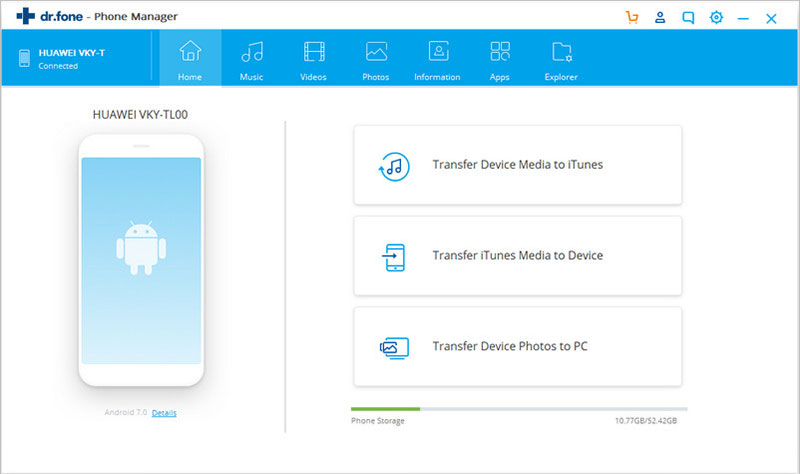
Step 2: dr.fone will recognize the device automatically and display the name on the left side of the main screen. Under your device, press the “Photos” option. You can choose category like Camera Roll, Photo Library, Photo Stream. As you select the options, you will notice the photographs present in each category on the right side of the screen. Select the photos you want to transfer to your Mac, and click "Export" >> "Export to Mac" to complete the process.

Part 2: How to Use iPhoto to Transfer Photos from iPad to Mac
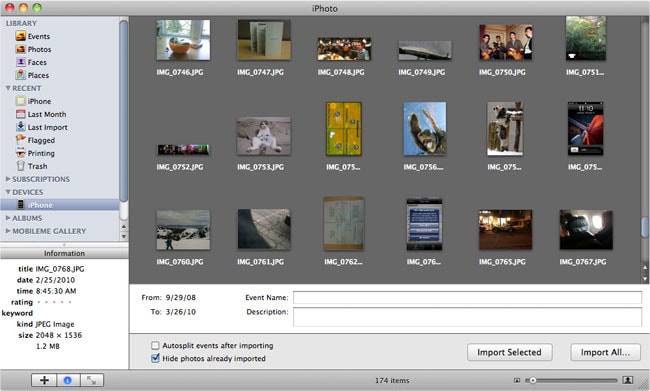
Another procedure to transfer photos from your iPad to Mac is by using iPhoto. The following guide will provide you the information needed to transfer the photos from iPad to Mac. Before proceeding, ensure that your Mac has the iPhoto application installed.
Step 1: Connect the iPad to the Mac using the given USB cable.
Step 2: Run iPhoto app on Mac. It will recognize your device automatically and display it under the DEVICES category.
Step 3: The right panel of the application will show the pictures contained in the iPad. You can select all or mark those that would like to copy.
Step 4: Press “Edit” button and select “Copy”. The option will copy all the pictures that you imported from iPad.
Step 5: Press “Edit” and choose “Paste” to paste the imported images to save them to your Mac hard disk.
Part 3: How to Export Photos from iPad to Mac via iCloud Photo Library
You can further copy photos from iPad to Mac using iCloud photo library. The following is a step-by-step guide that will help you move photos.
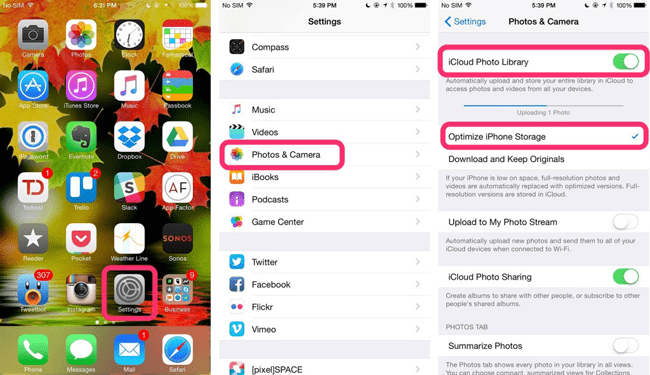
Before beginning, ensure that your software is up-to-date. Additionally, it is important that you login to your iCloud account on your iPad and Mac. Use the same Apple ID on both the devices. Furthermore, connect both the devices to your home Wi-Fi network.
Step 1: Turn on iCloud photo library on your iPad by going to the Settings menu – iCloud – Photos.
Step 2: Turn on iCloud photo library on your Mac. Go to system preferences - iCloud. Press the button next to the photos to view the options. Then, choose iCloud photo library to turn it on.
Step 3: By turning on the iCloud photo library, the photos present in your iPad will automatically add to the photo library on the Mac. Any changes or edits that you make will be kept and updated across all the devices.
Part 4: Transfer Photos from iPad to Mac via Preview
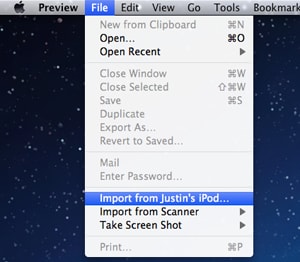
Connect your iPad to Mac with the USB cable > Launch preview > Press File at the upper left corner> Select import from iPad > Pith the photos that you want to transfer to Mac or choose Import All> Navigate to the destination folder to save the photos.
Note: Preview only supports the photographs located in the camera roll off your iPad.
Part 5: Copy Photos from iPad to Mac via Image Capture
With the help of Image Capture, you can upload pictures directly from scanners and digital cameras, which are connected to a network or a computer. You can also use the application to transfer photos from iPad to Mac.
Connect iPad to Mac with USB cable > Start Image Capture on Mac > Select your iPad under the devices if you do not see it > Choose the output folder to save the photos. You can pick selected photographs or choose Import All to transfer all the photos to your Mac
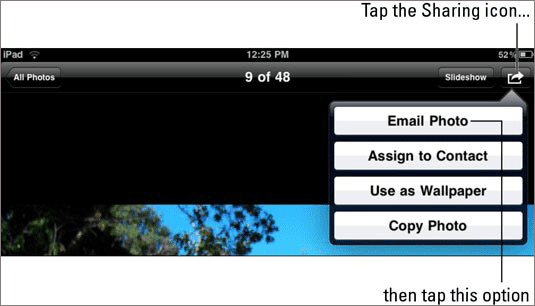
Part 6: Send Photos from iPad to Mac via Email
An alternative to transfer photos from iPad to Mac is by using email. The process is lengthy, but it will surely fulfill the requirement of moving the photos from your iPad.
Login to your email account on your iPad > Type your email ID in the “To” address field > From the attachments icon, navigate to the Photos folder and select the pictures that you want to copy to your Mac. Once attached> send the email.
Open the received email on your Mac > Download the attachments, which you can say want to your Mac hard drive.
Note: You have a cap of 25mb for attachments for a single email. The process is only useful if you have limited photographs that you wish to transfer to your Mac.