


Jump Cuts have become a remarkable way to create a compelling storyline in a video. Many content creators, including YouTube vloggers and filmmakers, use Jump cuts in their videos to keep the viewers engaged in the modern world. For people who don’t know, jump cuts in films are cuts that editors commonly use to break down a sequential shot into two different parts.
There are various situations where you can use a Jump-cut in your video to make an enticing storyline. For instance, if you edit a vlog for your YouTube channel, the Jump cut will be a great choice to get rid of the unnecessary fumbles and pauses. Similarly, if you’re editing cinematic footage, jump cuts will help you match the audio beats.
So, if you’ve been interested to know how to add a jump cut to your videos, continue reading. In this guide, we will share the most convenient way to apply jump cuts in your videos.
You may also like:
8 Best Jump Cut Editors You Should Know >>
- Part 1: Make Jump Cuts in Your Vlog & YouTube Videos with Filmora Video Editor >
- Part 2: Jump cut Vs. Match cut Vs. Smash cut >
Part 1: Make Jump Cuts in Your Vlog & YouTube Videos with Filmora Video Editor
To make jump cuts in the film, you’ll need a dedicated video editing tool. While there are many options to choose from, we recommend using Filmora Video Editor (or Filmora Video Editor for Mac) . It’s the latest edition of Filmora Video Editor that offers a wide variety of editing features that’ll help you compile engaging movies. Like its predecessors, Filmora X also utilizes a timeline-based interface. This will make your editing process much more comfortable. As far as jump cuts are concerned, you can use FIlmora’s “Cut” tool to apply them in a sequential shot instantly.
Key Features
- Provide Basic editing such as Cut, Trim, Crop, Rotate, etc.
- Advanced editing functionality such as color correction, PIP effect, and Chroma Key.
- Export video in different file formats.
- Available for Windows and macOS.
Step-by-step process on how to edit jump cuts using Filmora X
Step 1 - Install and launch Filmora X on your computer. Click Import Media Files Here to import the video that you want to edit.

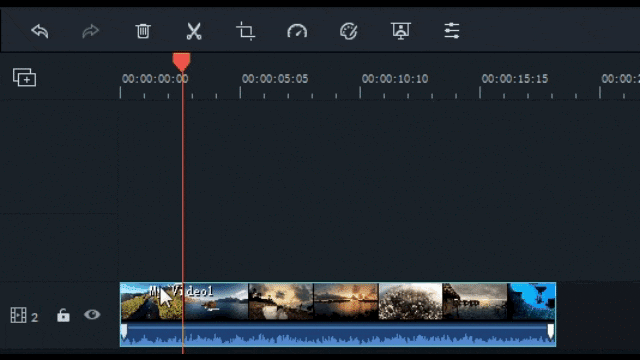
Step 2 - Load the clip to your timeline to get started. Now, play the video and pause where you want to cut. Then, use the Scissors icon to make the beginning of the cut. Again, play the video and pause where you want to jump in the frame. Using the Scissors tool, apply the end of the cut too.
Step 3 - Once you’ve applied the cut to your video, you’ll have three different clips on your screen. Delete the middle clip from the timeline. Now, again play the video, and you’ll notice the jump cut in the video.
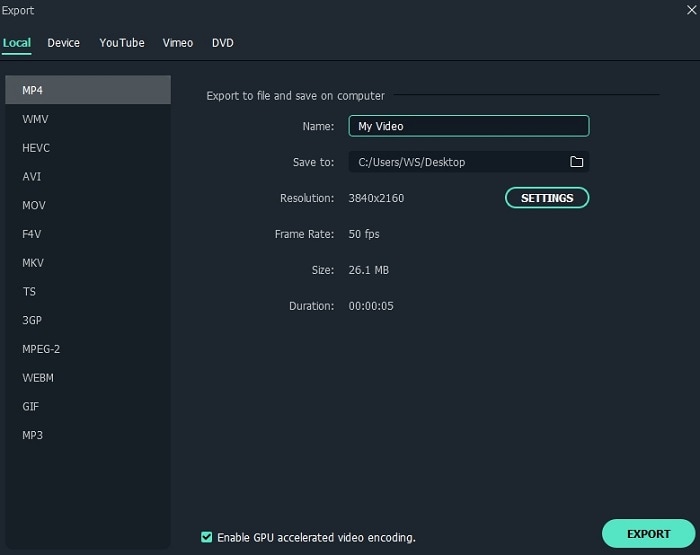
Step 4 - Now, click Export and select the desired output format to save the video on your computer. If you want, you can directly upload the video to YouTube as well.
That’s how you can apply jump cuts to a video using Filmora X.
Part 2: Jump cut Vs. Match cut Vs. Smash cut
Like Jump Cuts, you can also apply several other cuts to step up your editing game. Match Cut and Smash Cut are two of the most popular cuts in the editing world. Here’s what you need to know about them:
Match Cut: The match cut is applied between two different shots when the composition of both the shots is matched to reveal a continuous action. For instance, if you are walking out of one frame and walking into another, you can apply Match Cut to make the entire transition smoother.
Smash Cut: The Smash Cut is usually applied to deliver an unexpected jump from one frame to another in a storyline. It’s commonly used to convert dramatic sequences in your videos.
Final Thought
Applying jump cuts in films is a great editing technique to convey your story more effectively. But, if you want to make these cuts look smoother, you’ll need a professional editing tool such as FIlmora Video Editor. The tool will help you go forward/backward frame-by-frame and apply the cut to create a smooth transition. So, whether you’re planning to become a vlogger or a professional filmmaker, start using jump cuts in your videos to make them visually appealing.


