


Contents
- 2. Windows 10 Download & Install
- 2.1 Windows 10 Download
- 2.2.Windows 10 Free
- 2.3 Windows 10 Review
- 2.4 Windows 10 Upgrade
- 2.5 Windows 10 ISO
- 2.6 Windows 10 Features and Price
- 5.1 Windows 10 Trial Copy
- 5.2 Windows 10 YouTube
- 5.3 Windows 10 Versions
- 5.4 Windows 10 Office
- 5.5 Windows 10 Media Player
- 5.6 Windows 10 Software
- 5.7 Windows 10 Multiple Desktops
- 6.1 Downgrade Windows 10
- 6.2 Windows 10 Problems
- 6.3 Windows 10 vs Yosemite
- 6.4 Cortana vs Siri vs Google Now
- 7.1 Free DVD Creator for Windows 10
- 7.2 PDF Software for Windows 10
- 7.3 PDF Editor for Windows 10
- 7.4 Data Recovery for Windows 10
- 7.5 iPhone Data Recovery for Windows 10
- 7.6 Video Software for Windows 10
- 7.7 Edit Video on Windows 10
- 7.8 Video Converter for Windows 10
- 7.9 Play Videos on Windows 10
- 7.10 iTunes Alternative for Windows 10
The long wait for the arrival of Windows 10 is nearly over. The operating system will get launched on 29th July 2015 and remain free for a period of 1 year for those users that are upgrading their existing operating system from Windows 7 Service Pack 1 and Windows 8.1. It is great news for the world, but Microsoft Corporation will also reap the benefit as it will get its new operating system tested by a huge amount of people under different circumstances. Now coming back to Windows 10, it can be said with certainty that numerous fabulous features have been added to this new operating system to make it attractive for users. Multiple desktop is one of the best features to have been introduced in Windows 10. Although it is nothing new for the users of Mac and Linux machines, but it will be an important functionality for the Windows users. The Windows users will be happy to find that the functionality of multiple desktops is coming inbuilt with Windows 10. This feature helps in keeping multiple programs in the same screen while they have been opened at the same time. So there will be no need for shifting tabs and checking each program individually. This feature is named “Task View” in Windows 10.
1. Utilize multiple desktops.
After a long delay of so many versions, Microsoft Corporation has ultimately decided in favor of providing multiple desktop features in Windows 10. It is not possible to drag and drop an application from one desktop to another, but it is definitely possible to move an application between desktops. To utilize the functionality of multiple desktops, the user has to click the "Task View" button in the task bar or press "WINKEY+TAB".
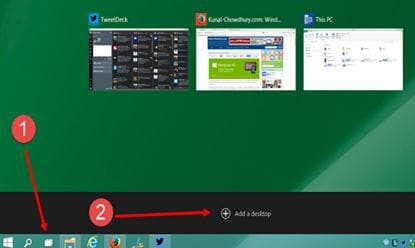
2. Add or remove desktops.
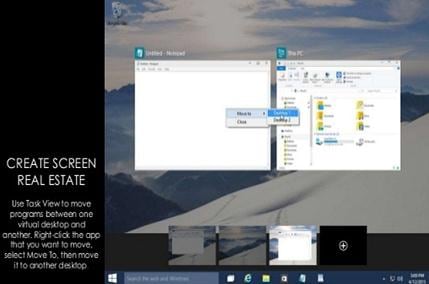
The user can add new desktops or remove desktops at his will by using the strip shown in the above picture. The user can also manage the desktops using the strip where all the thumbnails of created desktops get displayed. There is also the system of moving an application from one desktop to another. In moving an application, the user has to right click over the application and select "Move to". Then the user will be prompted with the destination desktops and the user has to select the desktop in which he or she wants the application to be moved. In this way a person can utilize the functionality of multiple desktops without any problem. At the start of Windows 10, there might be some restrictions to the use of multiple desktop functions, but it will definitely improve with time.
The functionality of multiple desktops can appear new to many users, but it is not at all hard to work with. In fact this is a ground breaking achievement on the part of Microsoft Corporation. This should be a great learning curve for many users. Firstly a person should press "Task View" option or click WINKEY+TAB to start the function of multiple desktops. Then the user has to select "Add a desktop". If more than one desktop is opened, then the button "Add a desktop" will appear as "+".
3. Switch desktops.
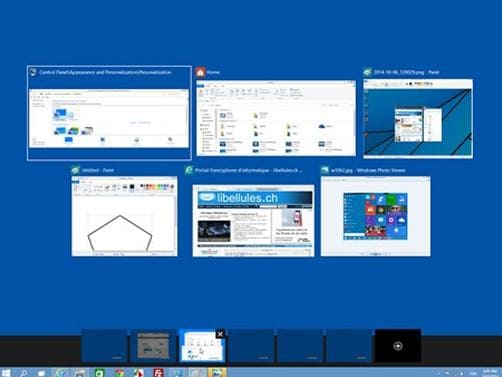
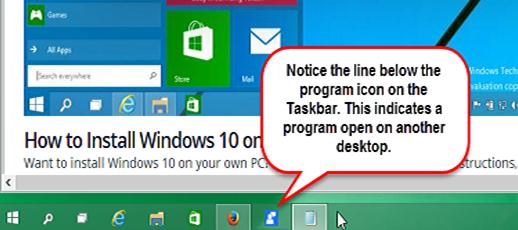
All the desktops that are opened will appear as thumbnails in the "Task View" panel. On moving the mouse over any of the desktop thumbnail, it will appear larger than the others. Now by just clicking two thumbnails in the "Task View" panel, they can be made active. The switching between desktops can also be done by just pressing WINKEY+TAB. By pressing only tab, the user can move from one desktop to another. The arrow keys can be used to move among the desktops displayed in the "Task View". Then on reaching the desired desktop the only thing needed is pressing "Enter" key to make it active. The task bar at the bottom also indicates if any program remains open within a created desktop.
4. Move an application between desktops.
For moving a program from one desktop to another the user does not need to be Einstein. First the user needs to click the "task View" button located in the taskbar. Then the user needs to select the thumbnail from which the program or application needs to be moved to another desktop. Then on right clicking on the application, the option "Move to" can be seen. With it there will appear the option for the user to choose the destination desktop. This is a very easy procedure and needs no technical knowledge. The program or the application will get moved and displayed in the destination desktop.
The user can also remove a thumbnail from "Task View" with ease. First thing that the user needs to do is click the "Task View" button located in the task bar. The "Task View" interface appears in the screen along with the thumbnails of all the open desktops. Now the user needs to just take the mouse over the thumbnail of the desktop that has to be closed. Then the user has to just click the "x" button that is displayed at the right hand top corner of that thumbnail. The desktop will get closed immediately. The beauty of Windows 10 lies in the fact that whenever a desktop gets closed with open program in it, the open program gets shifted to the next desktop in the left on the one that is closed. So if the user accidentally closes a desktop with open applications or running programs, then that application or program will not stop in the middle of the job it was performing.
This shows the reason why people are eagerly waiting for the launch of Windows 10. This kind of feature was never presented before the users of Windows ever before. In the previous versions of Windows, there was no opportunity of working with multiple desktops. Also if a person closed the desktop by mistake with any running open programs then that program would also get closed. This can result in loss of time for an individual. Microsoft Corporation should be credited for bringing in such advanced features for the lovers of Windows.


