


Contents
- 1.1 Best Windows Recovery
- 1.2 Windows Recovery Tools
- 1.3 Windows 10 Recovery Tools
- 1.4 Windows Recovery Freeware
- 1.5 Stellar Phoenix Alternative
- 1.6 Remo Recover Alternative
- 2. Recover Files from Windows
- 2.1 Recover Deleted Files
- 2.2 Recover Permanently Deleted Files
- 2.3 Restore Deleted Files
- 2.4 Recover Files from Recycle Bin
- 2.5 Recover Folder
- 2.6 Recover Mail
- 2.7 Recover Document
- 2.8 Recover Photo
- 2.9 Recover Partition
- 2.10 Recover Password
- 3. Windows Recovery Solutions
- 3.1 Windows Backup Recovery
- 3.2 Windows Restore
- 3.3 Windows System Recovery
- 3.4 Windows Error Recovery
- 3.5 Windows Recovery Disk
- 3.6 Windows Recovery Disc
- 3.7 Windows USB Recovery
- 3.8 Windows Recovery Mode
- 3.9 Windows Unexpected Shutdown
If your computer just won't start, you may have a serious problem at hand. The ideal way to resolve such a problem is to create a Windows recovery disc. Why? Windows 8.1 is designed to identify associated problems, and you may not have another option.
Create a recovery disk following basic guidelines offered by the operating system. It's important to complete the exercise as soon as Windows 8.1 or other versions of Windows are installed. Your computer can hang up for any number of reasons you need a hard copy as backup to recover a corrupt system on your computer.
Part 1. The Method for Creating Windows Recovery Disc
The idea is to troubleshoot and fix unknown problems on your personal computer from an external source. A USB recovery disc is stored outside, which is precisely why it's a good substitute for the recovery image stored on the computer.
The image is likely to occupy around 3 to 6 GB of space. Most users need to save space, and an external disk with capacity to hold at least 6 GB is required. Complete the basic requirement of saving all existing data on the USB flash drive, as the Windows recovery disc is overwritten creating dedicated space within the drive.
Simple steps to create a USB recovery drive include:
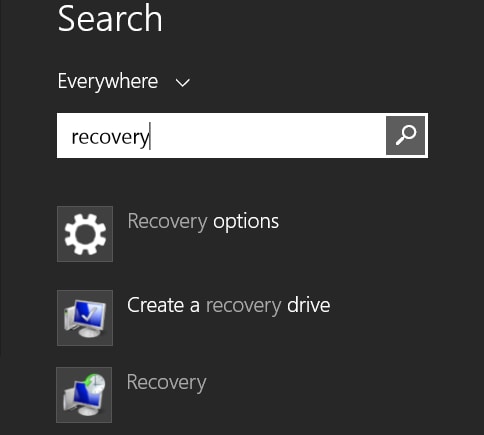
- Move your mouse around the top right corner of the screen along the edge and then tap Search when the option slides in.
- Type Recovery Drive into the search box.
- Click or tap on the option Create a Recovery Drive when it appears.
- Enter admin password if prompted or confirm the choice you made accordingly.
- The recovery drive tool appears. Ensure you select Copy Recovery Partition from PC to Recovery Drive option and then click or tap Next checkbox.
Depending on whether your personal computer was partitioned, checkbox options vary. If the PC had a partition, the recovery drive contains recovery image, tools, and bootable image. If not, the recovery image is omitted. You will not be able to reset or refresh the personal computer.
- Required disk size is indicated on the screen. Insert a suitable Windows recovery disc into the PC disk drive.
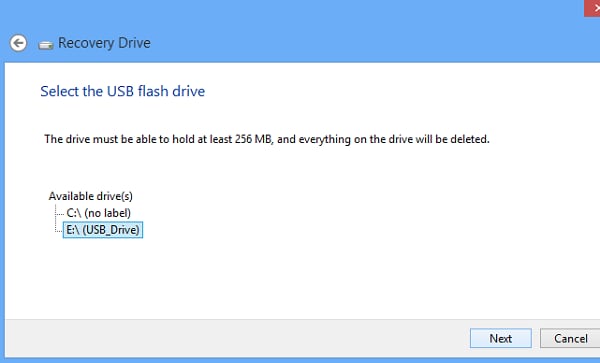
- Choose the USB drive from available options and click on Next.
- Click or tap on Create. The process of creating a Windows recovery disc begins and may take a while depending on your PC configurations and size of USB recovery disc.
Complete the exercise:
- Click on Finish to retain existing PC recovery partition or…
- Click on Delete the Recovery Partition when it appears to enable additional storage space on your computer.
- Once disk space is released, remove the recovery disk and click or tap on Finish.
Notes:
- If the original operating system was Windows 8, it is stored on the recovery image disc. An upgrade to Windows 8.1 on your PC does not copy on to the USB drive.
- Depending on computer configuration, you may not have the option to remove a recovery partition after the recovery disk is made. It simply means your PC does not utilise additional storage space and doesn't need a recovery partition.
Part 2. Best Windows Data Recovery Tool (Windows 10 Compatible)
As is evident, you may experience difficulty in completing the exercise of creating a Windows data recovery drive. You have a much easier option. Use iSkysoft Data Recovery for Windows, simply the best data recovery tool there is to recover lost data from a well-synchronized backup.
- Different kinds of files can be recovered.
- Software recognises and provides solutions in different data loss scenarios including damage partitions.
- NTFS, exFAT, FAT16, and FAT32 among other file systems are easily recovered.
- The software works on the latest Windows version (Windows 10).
- Previews of recovered data are available.
- Simple to use with a wizard-like interface.
- Highest success rate for data recovery ensured with deep scanning.
- Minimum risk with read-only process employed.
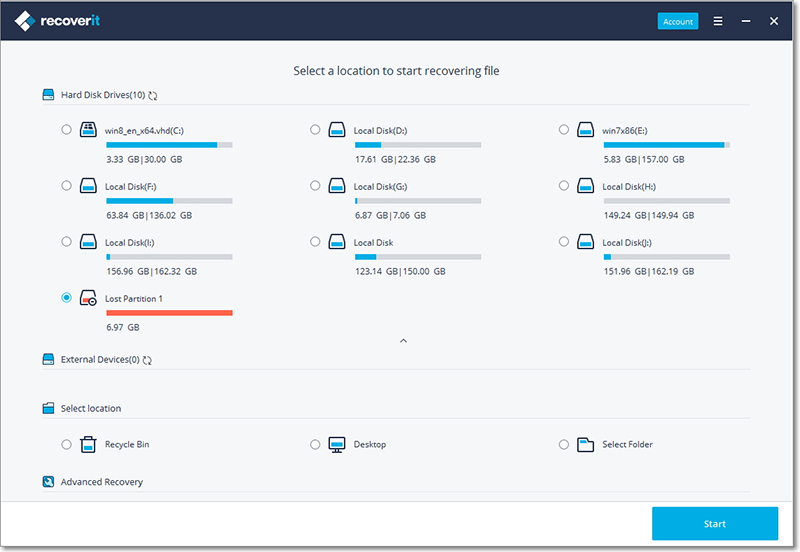
Three simple steps are employed to recover data on Windows using Recoverit (IS):
Step 1. Choose Recovery Mode
Launch the software on your computer and then choose from available Standard Mode recovery options including Resume, Partition, Raw File, and Lost File Recovery.
Tips: A faster method is offered through Wizard Mode. Users provide answers to a couple of quick questions. iSkysoft Data Recovery then automatically initiates and completes the process.
Step 2. Scan Your Windows Computer

Tick on Photo/Graphic, MP3/Audio, Video, Office Document, Email, or All File Types. Tick chosen drive and access folders or files. You can choose to enable "Deep Scan" for a better scanning result. Click "Start" to activate the scanning process.
Tips: Complete the scanning process before data recovery. It takes very little time, and a list of files to be recovered is presented in a preview. You can pause and stop scanning at any stage, or restart the process when required to save presented results for future reference.
Step 3. Recover the Items You Need

After the scanning is complete, you can then preview the found data and make selection of recovered files. Click "Recover" and choose drive to save.


