


Contents
- 1.1 Best Windows Recovery
- 1.2 Windows Recovery Tools
- 1.3 Windows 10 Recovery Tools
- 1.4 Windows Recovery Freeware
- 1.5 Stellar Phoenix Alternative
- 1.6 Remo Recover Alternative
- 2. Recover Files from Windows
- 2.1 Recover Deleted Files
- 2.2 Recover Permanently Deleted Files
- 2.3 Restore Deleted Files
- 2.4 Recover Files from Recycle Bin
- 2.5 Recover Folder
- 2.6 Recover Mail
- 2.7 Recover Document
- 2.8 Recover Photo
- 2.9 Recover Partition
- 2.10 Recover Password
- 3. Windows Recovery Solutions
- 3.1 Windows Backup Recovery
- 3.2 Windows Restore
- 3.3 Windows System Recovery
- 3.4 Windows Error Recovery
- 3.5 Windows Recovery Disk
- 3.6 Windows Recovery Disc
- 3.7 Windows USB Recovery
- 3.8 Windows Recovery Mode
- 3.9 Windows Unexpected Shutdown
Long gone are the days when you will have to go to a store buy a newly released Windows DVD. Now, the latest versions of windows are released over the air. Recently, Microsoft released a new version of Windows 10 which was available for absolutely free of cost for most of the users. Apart from that, users can also update to the Windows 10 with some clicks.
However, what should you do when your computer has got a problem and stuck at a certain problem? Sometimes the problem is big which may lead to deleting all data from your computer of causing mother board issues. The best way to deal with this problem is by creating a Windows USB recovery drive. Users with Windows 7, 8, 8.1 or 10 can easily make a USB recovery drive from the settings, however, other users can use the disks to make recovery drive.
Part 1. The Steps for Creating USB Recovery Drive in Windows
There are basically two methods of creating a windows USB recovery drive, both methods will work on Windows 10 but the second method will not work on older version of windows such as Windows 7, 8 and 8.1.

1. For Windows 7, 8 and 8.1:
- Connect the USB drive with your computer. Go to search from start menu or windows Tile on Windows 8 and 8.1 and search for the Create a recovery drive. You will need to have administrative privileges to use this software.
- If you want to make a recovery drive of important files on your computer, click Next. However, if you want to make a backup of the system files, make sure to check the last box on the screen. We will strongly recommend you to check this option because it will help you to recover and reinstall the Windows without any problem.
- Wait a little and let this tool find the USB drive attached with your computer, it will take just 2-3 seconds. As soon as it detects the USB drive, select the drive and hit the Next button again.
- Now, it will show you a dialogue stating that all the data from your USB will be removed. Click on Create button.
- First it will format the USB drive then whole backup of system files and other files will be transferred to the USB Drive. It will surely take some time, so, sit tight, relax and let the utility make the USB Recovery Drive.
- Once the Backup process is finished, you will see Delete the recovery partition from your PC on the main screen, click on it and select delete later on. This will surely help you save a lot of space on your computer.
2. For Windows 10:
This method is useful to automatically make the USB Recovery Drive on your computer. You can set the certain duration after which files will be automatically transferred to the USB drive on Windows 10.
- Connect the USB drive with your computer.
- Click on the Start Menu in the bottom left corner of your computer and then click on Settings.
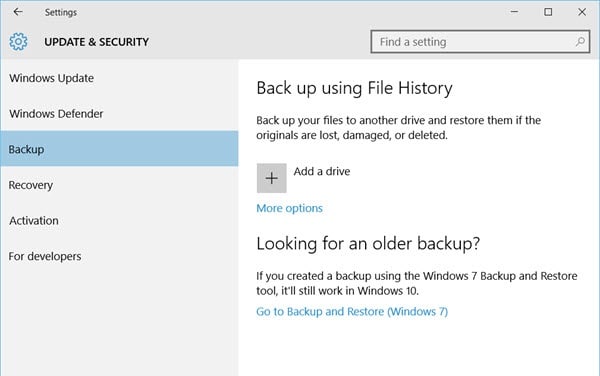
- On the main settings page, click on Update & Security.
- A new window will be opened; click on Backup and select add a Drive. Select the USB drive from the left panel.
- You will see a new "Automatically backup my files" toggle on the screen and it will be on. Click on More options to set different options for the recovery process.
- On the screen, you can select the folder that you want to back up on your drive. You can also set the duration for backup such as make a backup after certain minutes, hours or days.
That’s it! Your backup will be automatically made on the flash drive after the selected time period. Don’t unplug the USB drive during the whole backup process. You can also use Backup Now button to instantly backup the data to your USB Drive.
Part 2. The Program for Recovering Lost Data from Windows Drive (Windows 10 Compatible)
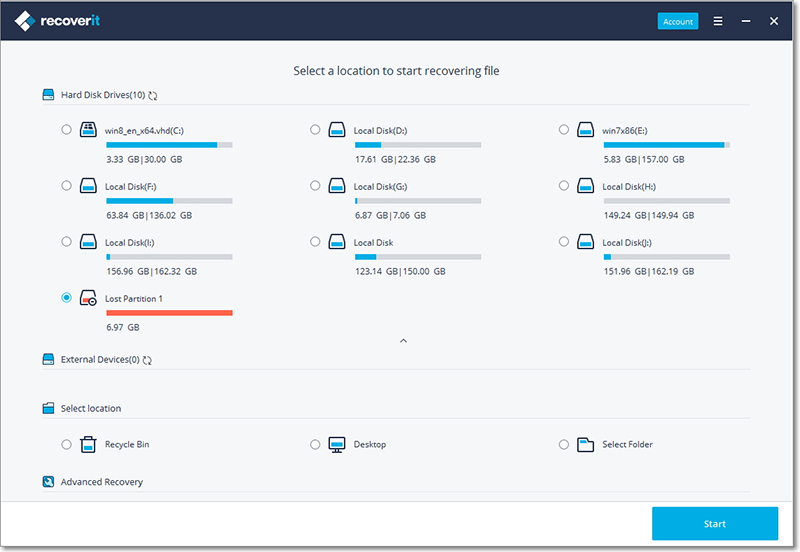
If you have made a USB recovery drive, it's good for future, but if you have already lost the previous data on your computer, you can restore it using iSkysoft Data Recovery for Windows. There are many great options and ways to recover data using this tool. From recently deleted items to a hard drive damage or format, you can always use a method depending upon your scenario.
The method to recover data from your hard drive is pretty much easy and provides on screen clear cut instructions for the users. Deep scan will let you restore the data even after a hard drive crash or format. With all these amazing features, Recoverit (IS) is the one perfect solution to recover any type of lost data from your computer.
Important Tips:
- Before you continue, make sure that you have saved your data from USB drive to another driver because creating a Windows USB recovery drive will remove all the data on your USB.
- The storage capacity of your USB should be at least 8GB, however, for larger data, we will recommend you a USB with more storage.
- Set the scheduled settings to prevent the loss of important data without any problem.
- Choose only the important files while making a USB recovery drive.
- Only use the USB drive which is not your regular ones, by this way, you can create a USB recovery drive and save it for the longer period of time.


