


After you buy a new external hard drive which comes in with only one partition from the manufacturer, when you intall it in Mac or PC, you always would rather to partition external hard drive into separated partition to store different types of files. Partitioning your hard drive can help organize your data and make your life more convenient. But many users think it is an arduous task to partition hard drive, so in this tutorial, we will goes through the detailed steps of partitioning an empty external hard drive in Mac and PC.
- Part 1. Partitioning External Hard Drive on Mac
- Part 2. Partitioning an External Hard Drive on Windows
- Part 3. Recovering Lost Data from External Hard Drive
Part 1. How to Partition an External Hard Drive on Mac
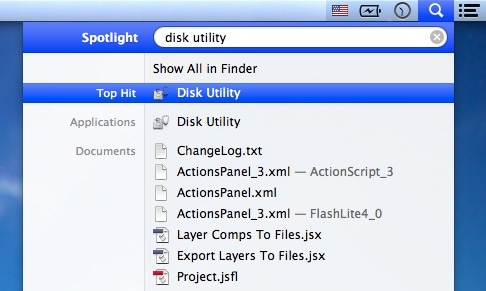
Step 1. Open a Finder
Open the Finder by clicking on the icon on the dock. Alternatively, you can open the Finder through launching a Spotlight by tapping on "CMD SPACE" and typing "Disk Utility" then press the "Return" key.
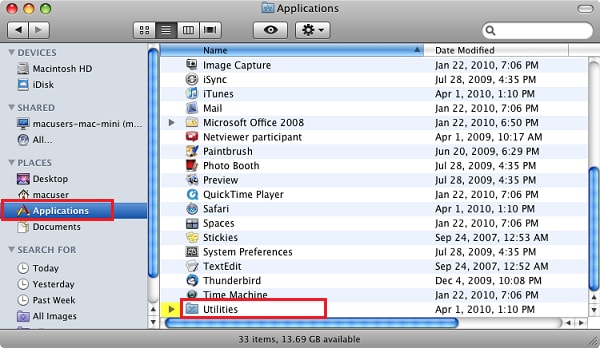
Step 2. Open Disk Utility
While on the Finder, click open Applications on your left hand side. Then scroll down to Utilities folder and double click on the folder. Double click on Disk Utility folder on Utilities folders to run the program.
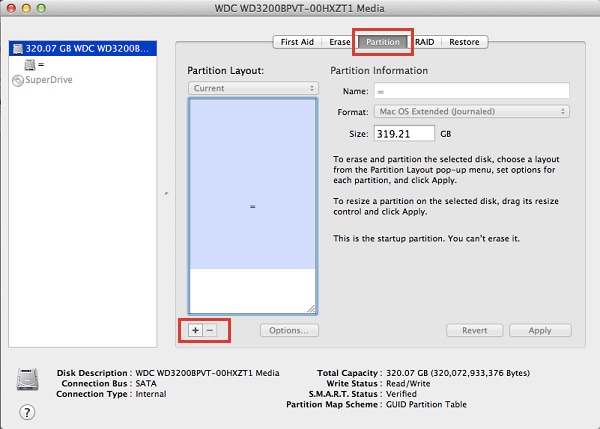
Step 3. Highlight the External Hard Drive to be Partitioned
On your left column, identify the hard drive you intent to partition then highlight. The hard drive you are looking for should be right above Macintosh HD. On the right side of the column, there is a row of tabs. Click on the one written "Partition" and a "Volume Scheme" section will appear.
The blue area shows the space taken up by your hard drive. The white area shows the free space that can be used for partitioning. Below the rectangular box, there are a "+" and "-" symbols, click on "+" sign to add a new partition.
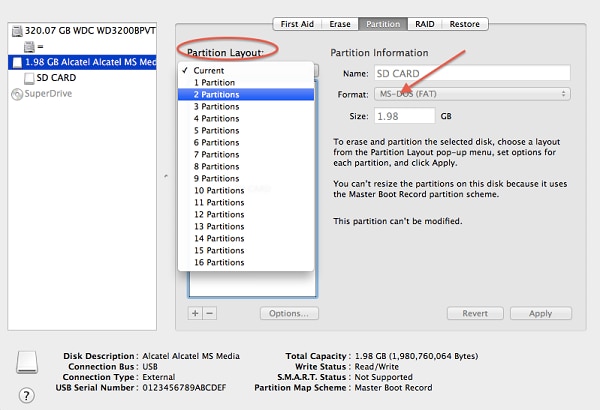
Step 4. Adding a New Partition
Once you click on "+" symbol, another box appears labeled Macintosh HD 2. To change the name, size of the drive (volume information) and format the disk, click on the new box once.
Note: Formatting the hard drive is necessary if you want to install a new operating system on the added partition.
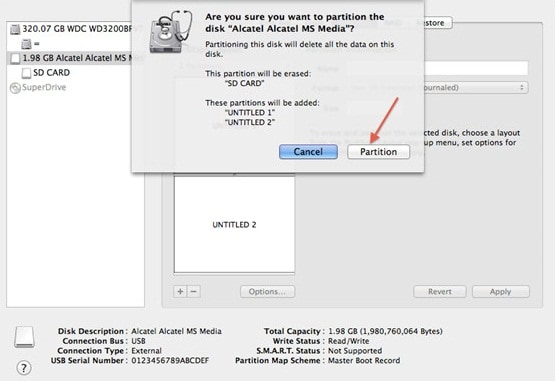
Step 5. Partition the Drive
After adjusting the components of your new partition, click "Apply" on the bottom of the screen. Immediately, a pop-up screen will appear, click on "Partition" dialogue box and wait for the partition to be added. It only takes a few minutes for the external hard disk to be partitioned. You can also use the preceding steps to partition the internal hard drive of your computer.
Part 2. How to do External Hard Drive Partition on Windows
Yes, you can partition your hard drive into a couple of logical units you desire. Partitioning your hard disk, you reduce the chances of your vital data being corrupted, thus separate data from operating system. This is how to partition your hard drive using window.
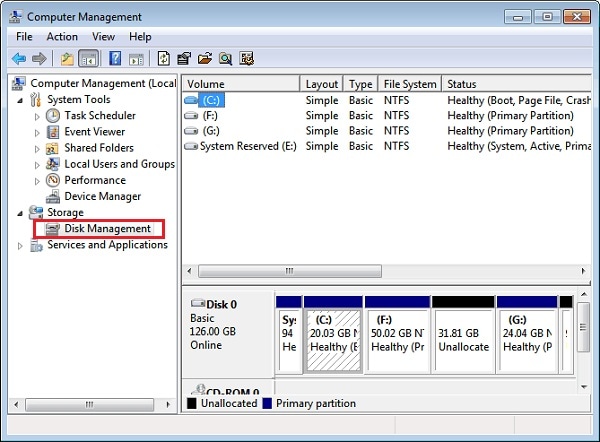
Step 1. Select Disk Management
Right click on the "Computer" icon and select "Manage". Click on "Manage" and select "Disk Management" below the "Storage" folder. While on Disk Management, you will see all partitions and disks on your PC.
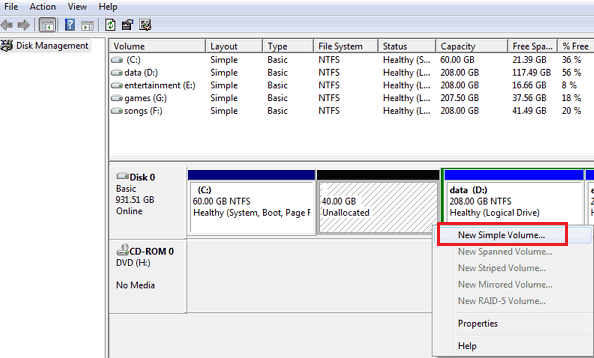
Step 2. Click on Shrink Volume Option
After shrinking the volume of your disk, Unallocated dialogue box in Disk Management screen. So, right click on the "Unallocated" box and then proceed to click on "New Simple Volume" box.
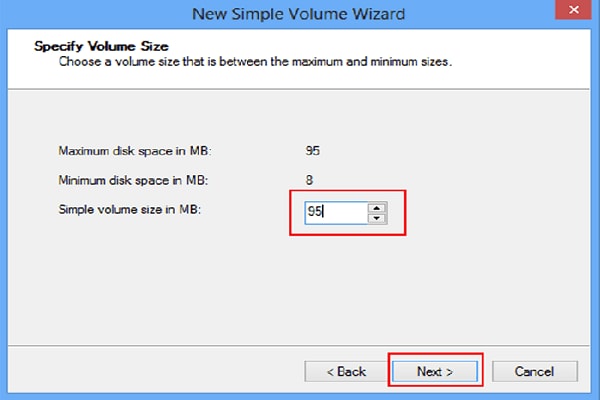
Step 3. Enter the Size to be Allocated to New Partition
On selecting a "New Simple Volume Wizard" option, a New Simple Volume Wizard screen appears. Click on "Next" option on the right corner of the bottom of the screen.
Here you are required to enter the amount of size that you want your new partition to contain. After entering the required size, click on "Next". Ensure that you're the figures your entered does not exceed the total amount of memory available.
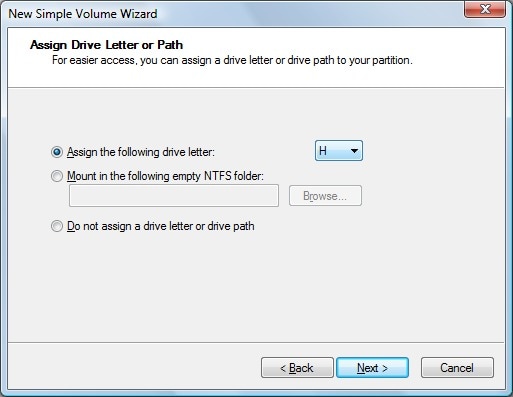
Step 4. Assign a Name to the New Partition
Assign a path or name to your new partition by selecting from the menu and then click on "Next" button. Assigning a name is important since it allows Windows to navigate and identify the new partition.
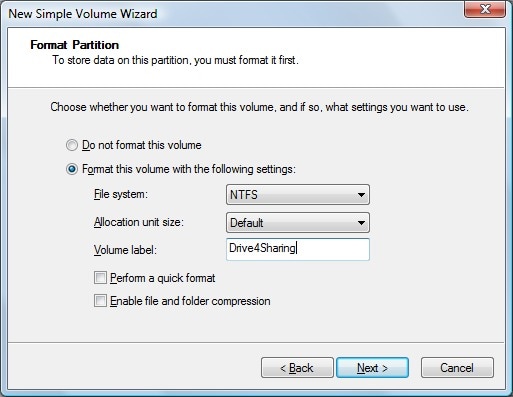
Step 5. Set Your New Volume or Partition
Select "Format" this volume and ensure that you select the following: Select "NTFS on File System" and "Default on Allocation unit size"; On Volume Label, enter the name you want the name drive to be referred. Finally, select "Perform a quick format" and then click on "Next".
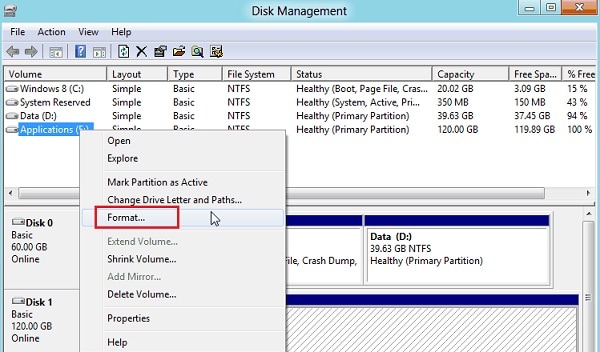
Step 6. Format Your New Partition
Once again, go through the settings you made previously and then click on "Finish" box. A pop-up window will appear on your screen, asking you to partition your new volume. Click on the "Format" disk first and make sure that you retain the previous settings and then click on "Start" option. You will also receive a warning concerning formatting but go further and select "OK".
If you followed the preceding steps correctly, you will notice that the new volume you created has been added to the Disk Management window.
Part 3. How to Recover Data from Partition External Hard Drive on Mac and Windows
Currently, many companies have come up with various data recovery applications to deal with data loss from external hard drives. However, Recoverit for Mac (or Recoverit for Windows) is one of the best applications and is dominating the market due to its unique features. This tool helps uses to recover all forms of lost data including photos, audio, documents, videos, and other vital data from external hard drive on Mac.
Easy Steps to Recover Data from Partition External Hard Drive
Step 1. Select Types for Your File
First, run the Data Recovery from Application folder after you have installed. Then attach the external hard drive to Mac computer. While on your primary window, select one or more file types to retrieve accurate lost files from external hard drive and click "Next" button to continue. It retains the original folders and file names.
Step 2. Choose a Drive and Start Scanning
In another window, select a drive you wish to recover lost files from. Thereafter, click on "Start" button, to scan all the existing files on your preferred drive. You can scan specific file types like audio, video, email, archive, or pictures.

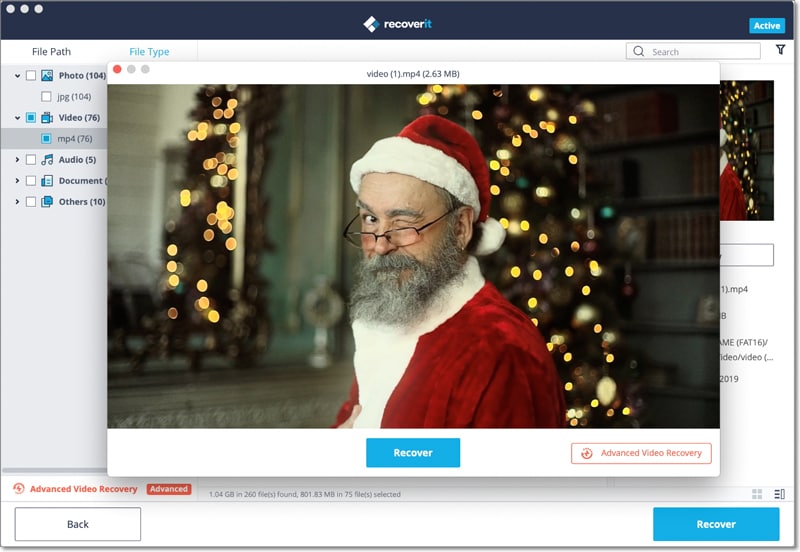
Step 3. External Hard Drive Partition Recovery
After scanning is complete, check your lost files in the bottom list. Use preview feature of the software, to check whether your lost files have all been found. Identify the types of files you wish to retrieve and tap on the "Recover" button. Choose a folder on Mac and not on the hard drive, and click "OK" to allow the external hard drive recovery process to begin.

Most people use external hard drives to store vital information and in a way keep it safe. The problem is such information can be loss due to virus infection, formatted hard drive, or files accidentally deleted.
And people usually use external hard drive device in order to keep their important information safe and secure. But what to do when data loss happened due to varies reasons like deleted the files mistakenly, formatted the drive, virus infection. Therefore, ensure that you at least have reliable software to be in the safe side. That is why you need Recoverit Data Recovery.


