


This guide is about how to edit videos on Windows PCs with Windows Movie Maker and edit video on Mac with iMovie. By following this guide, you are able to learn how to edit videos for free and share them through email, Web or CD. Using DVD burning tool, you can also turn your movies into DVDs. You can even back up the movies to video tape in camera and play them on camera itself or on a TV. Read on and learn how to use Windows Movie Maker to edit videos on PC for free .

Filmora Video Editor - the Best Windows Movie Maker Alternative
- Simple interface and streamlined video editing process make it the easiest tool to use
- Stunning effects are available for users to make your own stylish videos
- Supports almost any video and audio format: MP4, MP3, AVI, MTS, MKV, etc.
- Export video to most popular formats or directly to YouTube, Facebook and more
How to Edit Video on PC with Windows Movie Maker for Free
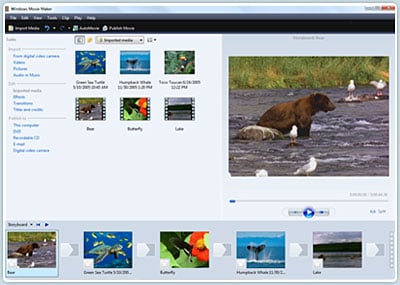
Windows Movie Maker 2.1 can make your home movies amazing. With the help of this software, you are able to edit, create, and share the movies on your Windows PCs. It allows you to create your own movies with just some drag-n-drops. You can also delete any unwanted shot and retain the best scenes. Also it is available to get Windows Movie Maker on Windows 10.
Capture video
Windows Movie Maker 2.1 supported formats:
- Video files: .avi, .asf, .mp2, .m1v, .mp2v, .mpeg, .mpe, .mpg, .mpv2, .wmv, and .wm
- Audio files: .aiff, .aif, .aifc, .mp2, .asf, .au, .snd, .wav, .mp3, .wma, and .mpa
- Picture files: .emf, .bmp, .gif, .dib, .jfif, .jpeg, .jpe, .jpg, .png, .tif, .wmf and .tiff
If your video formats are not in the above list, such as 3GP, FLV, MP4, MIDI, MOV, AAC, SWF or AIFF, you can use a video converter to convert the video to Windows Movie Maker 2.1 compatible formats.
Edit movie
-Add Video Transitions.
Open the movie maker. If the program is opened in “Timeline” view, you can go back to “Storyboard” view by clicking on the “Show Storyboard” tab. And click on “Tasks” to open “Edit Movie” tab. Then click the “View video transitions” and drag your desired transition to the storyboard. You will then view the effect. If you do not like the transition, you can click “Undo” button or right click the transition and choose “Delete” option to remove the transition. Or you can directly drag a new transition to cover the existing one.
-Add Video Effects.
Click “View video effects” option and drag any effect you want to the “Star” icon on the bottom left corner of the video thumbnail. The effect will be applied to your video. And you can click “Preview” to view the effect.
-Add Titles and Credits.
Click “Make titles or credits”, you will have several options for where to place the titles or credits. They may precede or follow a video clip or a picture, even can be used as an overlay.
Here are tips for you to add special effects to your movies using the Movie Maker.
Finish movie
If you are satisfied with the video, click the “File Menu” and select “Save Movie File” option. Then you have completed your movie.
Windows Movie Maker can compress all parts of your movie into a single one. The movie size is much smaller so it can be delivered to Web sites or emails. You can also save your movie to a CD or DVD. If you want to convert the movie to other video format like MP4, 3GP, FLV and more, you are recommended to use the video converter.
